1. Introduction
shadow-cljs provides everything you need to compile your ClojureScript projects with a focus on simplicity and ease of use. The provided build targets abstract away most of the manual configuration so that you only have to configure the essentials for your build. Each target provides optimal defaults for each environment and get an optimized experience during development and in release builds.
1.1. High-Level Overview
shadow-cljs is composed of 2 parts:
-
The shadow-cljs Clojure library which handles all the actual work.
-
The shadow-cljs
npmpackage which provides a convenient interface for running most of the build functionality directly from command line.
If desired you can easily integrate the shadow-cljs Clojure library into any other Clojure/JVM build tool (eg. leiningen or the Clojure CLI tools).
It is recommended to use the npm package as that provides a more optimized development experience tailored towards CLJS development.
1.2. Basic Workflow
When working with shadow-cljs you will be defining one or more builds in the shadow-cljs.edn configuration file. Each build will have a :target property which represents a configuration preset optimized for the target environment (eg. the Browser, a node.js application or a Chrome Extension).
Each build can either produce development or release output depending on the command used to trigger the compilation. The standard build commands are: compile, watch and release.
1.2.1. Development Mode
You can either compile a development build once or run a watch process which will monitor your source files and re-compile them automatically (and live-reload the code if desired).
All development builds are optimized for the developer experience with fast feedback cycles and other features like a REPL to directly interact with your running code.
A development build should never be shipped publicly since they can become quite large and may only work on the machine they were compiled on depending on the :target.
1.2.2. Release Mode
Creating a release build will strip out all the development related code and finally run the code through the Closure Compiler. This is an optimizing Compiler for JavaScript which will significantly reduce the overall size of the code.
1.3. Important Concepts
There are several important concepts that you should familiarize yourself with when using shadow-cljs. They are integral to understanding how everything fits together and how the tool works with your code.
1.3.1. The Classpath
shadow-cljs uses the Java Virtual Machine (JVM) and its "classpath" when working with files. This is a virtual filesystem composed of many classpath entries. Each entry is either
-
A local filesystem directory, managed by
:source-pathsentry in the configuration. -
Or a
.jarfile, representing Clojure(Script) or JVM libraries. These are compressed archives containing many files (basically just a.zipfile). These are added by your:dependencies.
In the Clojure(Script) everything is namespaced and each name is expected to resolve to a file. If you have a (ns demo.app) namespace the compiler expects to find a demo/app.cljs (or .cljc) on the classpath. The classpath will be searched in order until it is found. Suppose you configured the :source-paths ["src/main" "src/test"] the compiler will first look for a src/main/demo/app.cljs and then src/test/demo/app.cljs. When the file is not found on any source path the JVM will begin looking into the .jar files on the classpath. When it finds a demo/app.cljs at the root of any of the libraries that file it will be used.
|
Important
|
When a filename exists multiple times on the classpath then only the first one is used. Everything on the JVM and Clojure(Script) is namespaced to avoid such conflicts. Very similar to npm where each package must have a unique name.
|
It is therefore recommended to be very disciplined about the names you choose and about properly namespacing everything. It may seem repetitive to always use (ns your-company.components.foo) over (ns components.foo) but it will save you from lot of headaches later on.
This is unlike npm where the package name itself is never used inside the package itself and only relative paths are used.
1.3.2. Server Mode
shadow-cljs can be started in "server" mode which is required for long-running tasks such as watch. A watch will implicitly start the server instance if it is not already running. The server will provide the Websocket endpoint that builds will connect to as well as all the other endpoints for nREPL, Socket REPL and the development HTTP servers.
When using the shadow-cljs CLI all commands will re-use a running server instance JVM instead of starting a new JVM. This is substantially faster since start-up time can be quite slow.
Once the server is running however you only have to restart it whenever your :dependencies change and everything else can be done via the REPL.
1.3.3. REPL
The REPL is at the heart of all Clojure(Script) development and every CLI command can also be used directly from the REPL as well. It is absolutely worth getting comfortable with the REPL even if the command line may seem more familiar.
1.4. About this Book
1.4.1. Work in Progress
This is a work in progress. If you find an error, please submit a PR to fix it, or an issue with details of the problem.
1.4.2. Contributing
This source for this book is hosted on Github.
1.4.3. Conventions Used
There are many examples in this book. Most things used in these should be obvious from their context, but to prevent misunderstanding it is important to know the author’s intentions.
When command-line examples are given we may include BASH comments (starting with #), and will
usually include the standard user UNIX prompt of $ to indicate separation of the command
from its output.
# A comment. This command lists files:
$ ls -l
shadow-cljs.edn
project.clj
...
Many of the examples are of the configuration file for the compiler. This file contains an EDN map. Where we have already discussed required options we will often elide them for clarity. In this case we’ll usually include an ellipsis to indicate "content that is required but isn’t in our current focus":
{:dependencies [[lib "1.0"]]}{...
:source-paths ["src"]
...}This allows us to concisely include enough context to understand the nesting of the configuration of interest:
{...
 :builds {:build-id {...
                     :output-dir "resources/public/js"}}}
Code examples may be similarly shortened.
2. Installation
2.1. Standalone via npm
You will need:
-
node.js (v6.0.0+, most recent version preferred)
-
Any Java SDK (Version 21 or higher, LTS release recommended). https://adoptium.net/
In your project directory you’ll need a package.json. If you do not have one yet you can create one by running npm init -y. If you don’t have a project directory yet consider creating it by running
$ npx create-cljs-project my-projectThis will create all the necessary basic files and you can skip the following commands.
If you have a package.json already and just want to add shadow-cljs run
$ npm install --save-dev shadow-cljs$ yarn add --dev shadow-cljsFor convenience, you can run npm install -g shadow-cljs or yarn global add shadow-cljs. This will let you run the shadow-cljs command directly later. There should always be a shadow-cljs version installed in your project, the global install is optional.
2.2. Library
Although it is recommended to run the standalone version via npm you can also embed shadow-cljs into any other Clojure JVM tool (eg. lein, boot, …).
The artifact can be found at:


3. Usage
shadow-cljs can be used in many different ways but the general workflow stays the same.
During development you have the option to compile a build once or run a watch worker which watches your source files for changes and re-compiles them automatically. When enabled the watch will also hot-reload your code and provide a REPL. During development the focus is on developer experience with fast feedback cycles. Development code should never be shipped to the public.
When it is time to get serious you create a release build which creates an optimized build suitable for production. For this the Closure Compiler is used which applies some seriously :advanced optimizations to your code to create the most optimal output available. This may require some tuning to work properly when using lots of interop with native JavaScript but works flawlessly for ClojureScript (and the code from the Closure Library).
3.1. Command Line
If installed globally, you can use the shadow-cljs command directly.
$ shadow-cljs helpIf you prefer to only use the local npm install you can invoke it via npx or yarn.
# npm
$ npx shadow-cljs help

# yarn
$ yarn shadow-cljs help

# manually
$ ./node_modules/.bin/shadow-cljs help
The guide will assume there is a global install to keep examples short but this is not required.
# compile a build once and exit
$ shadow-cljs compile app

# compile and watch
$ shadow-cljs watch app

# connect to REPL for the build (available while watch is running)
$ shadow-cljs cljs-repl app

# connect to standalone node repl
$ shadow-cljs node-repl$ shadow-cljs release appSometimes you may run into some release issues due to :advanced compilation. These
commands can help track down the causes.
$ shadow-cljs check app
$ shadow-cljs release app --debug
3.1.1. Server Mode
A shadow-cljs command can be fairly slow to start. To improve this shadow-cljs can run in "server mode" which means that a dedicated process is started which all other commands can use to execute a lot faster since they won’t have to start a new JVM/Clojure instance.
Commands that do long-running things implicitly start a server instance (eg. watch) but it is often advisable to have
a dedicated server process running.
You can run the process in the foreground in a dedicated terminal. Use CTRL+C to terminate the server.
$ shadow-cljs server

# or (if you'd like REPL to control the server process)
$ shadow-cljs clj-repl
You can also run the server in the background controlled via the common start|stop|restart functions.
$ shadow-cljs start
$ shadow-cljs stop
$ shadow-cljs restart
Once any server is running every other command will use that and run much faster.
3.2. Build Tool Integration
shadow-cljs can integrate with other Clojure tools since the primary distribution is just a .jar file available via Clojars. By default your :dependencies are managed via shadow-cljs.edn but you can use other builds tools to manage your dependencies as well.
|
Caution
|
It is strongly recommended to use the standalone shadow-cljs version. The command does a lot of things to optimize the user experience (e.g. faster startup) which are not done by other tools. You’ll also save yourself a lot of headaches dealing with dependency conflicts and other related errors.
|
3.2.1. Leiningen
If you’d like to use Leiningen to manage your dependencies, you can do so by adding a :lein entry to your shadow-cljs.edn config. With this setting, the shadow-cljs command will use lein to launch the JVM, ignoring any :source-paths and :dependencies in shadow-cljs.edn; relying instead on lein to set them from project.clj.
{:lein true
 ; :source-paths and :dependencies are now ignored in this file
 ; configure them via project.clj
:builds { ... }lein profile{:lein {:profile "+cljs"}
:builds {...}}(defproject my-awesome-project
...
:profiles
{:cljs
{:source-paths ["src/cljs"]
:dependencies [[thheller/shadow-cljs "..."]
[reagent "0.8.1"]]}})When using project.clj to manage your :dependencies you must manually include the thheller/shadow-cljs artifact in your :dependencies (directly or in a profile).
|
Important
|
When you are running into weird Java Stackstraces when starting shadow-cljs or trying compile builds you may have a dependency conflict. It is very important that shadow-cljs is used with proper matching org.clojure/clojurescript and closure-compiler versions. You can check via lein deps :tree and the required versions are listed on clojars (on the right side).
|
Running Tasks Directly From Leiningen
You may also directly execute shadow-cljs commands via lein if you prefer to not use the shadow-cljs command itself.
|
Important
|
It is recommended to still use the shadow-cljs command to run commands since that will take full advantage of a running server mode instance. This will run commands substantially faster than launching additional JVMs when using lein directly.
|
$ lein run -m shadow.cljs.devtools.cli compile build-id$ lein run -m shadow.cljs.devtools.cli release build-id3.2.2. tools.deps / deps.edn
The new deps.edn can also be used to manage your :dependencies and :source-paths instead of using the built-in methods or lein. All shadow-cljs commands will then be launched via the new clojure utility instead.
|
Important
|
tools.deps is still changing quite frequently. Make sure you are using the latest version.
|
To use this set the :deps true property in your config. It is also possible to configure which deps.edn aliases should be used.
You must add the thheller/shadow-cljs artifact to your deps.edn manually.
shadow-cljs.edn example{:deps true
:builds ...}deps.edn example{:paths [...]
:deps {thheller/shadow-cljs {:mvn/version <latest>}}}shadow-cljs.edn with :cljs alias{:deps {:aliases [:cljs]}
:builds ...}deps.edn{:paths [...]
:deps {...}
:aliases
{:cljs
{:extra-deps {thheller/shadow-cljs {:mvn/version <latest>}}}}With this you are all set, and can run shadow-cljs as normal.
Option: Running via clj directly
Optionally, if you want to skip running the shadow-cljs command line tool directly, you may as well just run directly via clj.
|
Important
|
This bypasses the "server mode". Meaning that everything you run will run a new JVM instance and potentially be much slower. You’ll lose out on some features outlined here. Other than that the compilation results will be identical. |
{:paths [...]
 :deps {...}
 :aliases
 {:shadow-cljs
  {:extra-deps {thheller/shadow-cljs {:mvn/version <latest>}}
   :main-opts ["-m" "shadow.cljs.devtools.cli"]}}}
clj -M:shadow-cljs watch appYou may also specify additional aliases via the command line using -M, eg. shadow-cljs -M:foo:bar ….
3.2.3. Boot
The authors have little Boot experience, so this chapter is in need of contributions. We understand
that Boot allows you to build your tool chain out of functions. Since shadow-cljs is a normal
JVM library, you can call functions within it to invoke tasks.
Some boot tasks are available here: https://github.com/jgdavey/boot-shadow-cljs
3.3. Running Clojure Code
You can use the shadow-cljs CLI to call specific Clojure functions from the command line. This is useful when you want to run some code before/after certain tasks. Suppose you wanted to rsync the output of your release build to a remote server.
src/my/build.clj(ns my.build
(:require
[shadow.cljs.devtools.api :as shadow]
[clojure.java.shell :refer (sh)]))
(defn release []
(shadow/release :my-build)
(sh "rsync" "-arzt" "path/to/output-dir" "my@server.com:some/path"))release function$ shadow-cljs clj-run my.build/release
# or
$ shadow-cljs run my.build/releaseYou can pass arguments to the invoked functions via the command line.
...
(defn release [server]
  (shadow/release :my-build)
(sh "rsync" "-arzt" "path/to/output-dir" server))$ shadow-cljs clj-run my.build/release my@server.com:some/path|
Tip
|
The usual (defn release [& args]) structure also works if you want to parse the args with something like tools.cli.
|
You have access to the full power of Clojure here. You can build entire tools on top of this if you like. As a bonus everything you write this way is also directly available via the Clojure REPL.
|
Important
|
When the server is running the namespace will not be reloaded automatically, it will only be loaded once. It is recommended to do the development using a REPL and reload the file as usual (eg. (require 'my.build :reload)). You may also run shadow-cljs clj-eval "(require 'my.build :reload)" to reload manually from the command line.
|
3.3.1. Calling watch via clj-run
By default the functions called by clj-run only have access to a minimal shadow-cljs runtime which is enough to run compile, release and any other Clojure functionality. The JVM will terminate when your function completes.
If you want to start a watch for a given build you need to declare that the function you are calling requires a full server. This will cause the process to stay alive until you explicitly call (shadow.cljs.devtools.server/stop!) or CTRL+C the process.
(ns demo.run
  (:require [shadow.cljs.devtools.api :as shadow]))

;; this fails because a full server instance is missing
(defn foo
  [& args]
  (shadow/watch :my-build))

;; this metadata will ensure that the server is started so watch works
(defn foo
  {:shadow/requires-server true}
  [& args]
  (shadow/watch :my-build))
4. REPL
The REPL is a very powerful tool to have when working with Clojure(Script) code. shadow-cljs provides several built-in variants that let you get started quickly as well as variants that are integrated into your standard builds.
When you quickly want to test out some code the built-in REPLs should be enough. If you need more complex setups that also do stuff on their own it is best to use an actual build.
4.1. ClojureScript REPL
By default you can choose between a node-repl and a browser-repl. They both work similarly and the differentiating factor is that one runs in a managed node.js process while the others opens a Browser Window that will be used to eval the actual code.
4.1.1. Node REPL
$ shadow-cljs node-replThis starts a blank CLJS REPL with an already connected node process.
|
Important
|
If you exit the Node REPL the node process is also killed!
|
node-repl lets you get started without any additional configuration. It has access to all your code via the usual means, ie. (require '[your.core :as x]). Since it is not connected to any build it does not do any automatic rebuilding of code when your files change and does not provide hot-reload.
4.1.2. Browser REPL
$ shadow-cljs browser-replThis starts a blank CLJS REPL and will open an associated Browser window where the code will execute. Besides running in the Browser this has all the same functionality as the above node-repl.
|
Important
|
If you close the Browser window the REPL will stop working. |
4.1.3. Build-specific REPL
node-repl and browser-repl work without any specific build configuration. That means they’ll only do whatever you tell them to do but nothing on their own.
If you want to build a specific thing you should configure a build using one of the provided build-targets. Most of them automatically inject the necessary code for a ClojureScript REPL. It should not require any additional configuration. For the build CLJS REPL to work you need 2 things
-
a running
watchfor your build -
connect the JS runtime of the
:target. Meaning if you are using the:browsertarget you need to open a Browser that has the generated JS loaded. For node.js builds that means running thenodeprocess.
Once you have both you can connect to the CLJS REPL via the command line or from the Clojure REPL.
$ shadow-cljs watch build-id
...

# different terminal
$ shadow-cljs cljs-repl build-id
shadow-cljs - connected to server
[3:1]~cljs.user=>$ shadow-cljs clj-repl
...
[2:0]~shadow.user=> (shadow/watch :browser)
[:browser] Configuring build.
[:browser] Compiling ...
[:browser] Build completed. (341 files, 1 compiled, 0 warnings, 3,19s)
:watching
[2:0]~shadow.user=> (shadow/repl :browser)
[2:1]~cljs.user=>|
Tip
|
Type :repl/quit to exit the REPL. This will only exit the REPL, the watch will remain running.
|
|
Tip
|
You may run multiple watch "workers" in parallel and connect/disconnect to their REPLs at any given time.
|
[3:1]~cljs.user=> (js/alert "foo")
There is no connected JS runtime.
If you see this you need to open your App in the Browser or start the node process.
4.2. Clojure REPL
A Clojure REPL is also provided in addition to the provided ClojureScript REPLs. This is can be used to control the shadow-cljs process and run all other build commands through it. You can start with a Clojure REPL and then upgrade it to a CLJS REPL at any point (and switch back).
$ shadow-cljs clj-repl
...
shadow-cljs - REPL - see (help), :repl/quit to exit
[1:0]~shadow.user=>
The shadow.cljs.devtools.api namespace has functions that map more or less 1:1 to the CLI counterparts. It is aliased as shadow by default.
;; shadow-cljs watch foo
(shadow.cljs.devtools.api/watch :foo)
;; this is identical, due to the provided ns alias
(shadow/watch :foo)
;; shadow-cljs watch foo --verbose
(shadow/watch :foo {:verbose true})
;; shadow-cljs compile foo
(shadow/compile :foo)
;; shadow-cljs release foo
(shadow/release :foo)

;; shadow-cljs browser-repl
(shadow/browser-repl)
;; shadow-cljs node-repl
(shadow/node-repl)
;; shadow-cljs cljs-repl foo
(shadow/repl :foo)

;; Once you are in a CLJS REPL you can use
:repl/quit
;; or
:cljs/quit
;; to drop back down to CLJ.
4.2.1. Embedded
It is also possible to use shadow-cljs entirely from within any other CLJ process. As long as the thheller/shadow-cljs artifact was loaded on the classpath you are good to go.
lein repl$ lein repl
nREPL server started on port 57098 on host 127.0.0.1 - nrepl://127.0.0.1:57098
REPL-y 0.4.3, nREPL 0.6.0
Clojure 1.10.0
...
user=> (require '[shadow.cljs.devtools.server :as server])
nil
user=> (server/start!)
...
:shadow.cljs.devtools.server/started
user=> (require '[shadow.cljs.devtools.api :as shadow])
nil
user=> (shadow/compile :foo)
...You can stop the embedded server by running (shadow.cljs.devtools.server/stop!). This will also stop all running build processes.
|
Important
|
If you want to switch to a CLJS REPL this may require additional setup in the tool you used to start the server in. Since lein will default to using nREPL it will require configuring additional nREPL :middleware. When using clj you are good to go since it doesn’t use nREPL.
|
5. Configuration
shadow-cljs is configured by a shadow-cljs.edn file in your project root directory. You can
create a default one by running shadow-cljs init. It should contain a map with some global
configuration and a :builds entry for all your builds.
{:source-paths [...]
 :dependencies [...]
 :builds {...}}
An example config could look like this:
{:dependencies
 [[reagent "0.8.0-alpha2"]]

 :source-paths
 ["src"]

 :builds
 {:app {:target :browser
        :output-dir "public/js"
        :asset-path "/js"
        :modules {:main {:entries [my.app]}}}}}
The file structure for this example should look like this:
.
├── package.json
├── shadow-cljs.edn
└── src
    └── my
        └── app.cljs
5.1. Source Paths
:source-paths configures your JVM classpath. The compiler will use this config to find Clojure(Script) source files (eg. .cljs).
It is fine to put everything into one source path but you can use multiple if you want to "group" source files in certain ways. It is useful if you want to keep your tests separate for example.
{:source-paths ["src/main" "src/test"]
...}.
├── package.json
├── shadow-cljs.edn
└── src
└── main
└── my
└── app.cljs
└── test
└── my
└── app_test.cljsIt is not recommended to separate source files by extension (eg. src/clj, src/cljs, src/cljc). For some reason this is widely used in CLJS project templates but it just makes things harder to use.
5.2. Dependencies
5.2.1. Clojure(Script)
Your dependencies are managed via the :dependencies key at the root of the shadow-cljs.edn config file. They are declared in the same notation that other Clojure tools like lein or boot use.
Each dependency is written as a vector using [library-name "version-string"] nested in one outer vector.
{:source-paths ["src"]
 :dependencies [[reagent "0.9.1"]]
 :builds ...}
Notice that the source path is only specified once in the entire configuration. The system will use namespace dependency graphs to determine what code is needed in the final output of any given build.
5.2.2. JavaScript
shadow-cljs integrates fully with the npm ecosystem to manage JavaScript dependencies.
You can use npm or yarn to manage your dependencies, please refer to their respective documentation.
Both manage your dependencies via a package.json file in your project directory. Almost every package available via npm will explain how to install it. Those instructions now apply to shadow-cljs as well.
# npm
$ npm install the-thing

# yarn
$ yarn add the-thing
Nothing more is required. Dependencies will be added to the package.json file and this will be used to manage them.
|
Tip
|
If you don’t have a package.json yet run npm init from a command line.
|
Missing JS Dependency?
You might run into errors related to missing JS dependencies. Most ClojureScript libraries do not yet declare the npm packages they use since they still expect to use CLJSJS. We want to use npm directly which means you must manually install the npm packages until libraries properly declare the :npm-deps themselves.
The required JS dependency "react" is not available, it was required by ...This means that you should npm install react.
|
Tip
|
In the case of react you probably need these 3 packages: npm install react react-dom create-react-class.
|
5.3. User Configuration
Most configuration will be done in the projects themselves via shadow-cljs.edn but some config may be user-dependent. Tools like CIDER may require the additional cider-nrepl dependency which would be useless for a different team member using Cursive when adding that dependency via shadow-cljs.edn.
A restricted set of config options can be added to ~/.shadow-cljs/config.edn which will then apply to all projects built on this users machine.
Adding dependencies is allowed via the usual :dependencies key. Note that dependencies added here will apply to ALL projects. Keep them to a minimum and only put tool related dependencies here. Everything that is relevant to a build should remain in shadow-cljs.edn as otherwise things may not compile for other users. These dependencies will automatically be added when using deps.edn or lein as well.
{:dependencies
 [[cider/cider-nrepl "0.21.1"]]}
;; this version may be out of date, check whichever is available
When using deps.edn to resolve dependencies you may sometimes want to activate additional aliases. This can be done via :deps-aliases.
;; shadow-cljs.edn in project
{:deps {:aliases [:cljs]}}

;; ~/.shadow-cljs/config.edn
{:deps-aliases [:cider]}
This will make the shadow-cljs command use the [:cider :cljs] aliases in projects using deps.edn. This might be useful if you have an additional :cider alias in your ~/.clojure/deps.edn.
By default the shadow-cljs server-mode will launch an embedded nREPL server which you might not need. You can disable this by setting :nrepl false in user config.
The only other currently accepted value in the user config is the :open-file-command. No other options are currently have any effect.
5.4. Server Options
This section is for other options that configure the shadow-cljs server instance. They are optional.
5.4.1. nREPL
The shadow-cljs server provides a nREPL server via TCP. If you look at the startup message you’ll see the port of nREPL, and the port will also be stored in target/shadow-cljs/nrepl.port:
$ shadow-cljs watch app
shadow-cljs - HTTP server available at http://localhost:8600
shadow-cljs - server version: <version> running at http://localhost:9630
shadow-cljs - nREPL server started on port 64967
shadow-cljs - watching build :app
[:app] Configuring build.
[:app] Compiling ...
You can configure the port and additional middleware with shadow-cljs.edn:
{...
 :nrepl {:port 9000
         :middleware []} ; optional list of namespace-qualified symbols
 ...}
The default global config file in ~/.nrepl/nrepl.edn or the local .nrepl.edn will also be loaded on startup and can be used to configure :middleware.
If the popular middleware cider-nrepl is found on the classpath (e.g. it’s included in :dependencies), it will be used automatically. No additional configuration required. This can be disabled by setting :nrepl {:cider false}.
You may configure the namespace you start in when connecting by setting :init-ns in the :nrepl options. It defaults to shadow.user.
{...
 :nrepl {:init-ns my.repl}
 ...}
The nREPL server can be disabled by setting :nrepl false.
nREPL Usage
When connecting to the nREPL server the connection always starts out as a Clojure REPL. Switching to a CLJS REPL works similarly to the non-nREPL version. First the watch for the given build needs to be started and then we need to select this build to switch the current nREPL session to that build. After selecting the build everything will be eval’d in ClojureScript instead of Clojure.
(shadow/watch :the-build)
(shadow/repl :the-build)|
Tip
|
Use :cljs/quit to return to Clojure.
|
Embedded nREPL Server
When you use shadow-cljs embedded in other tools that provide their own nREPL server (eg. lein) you need to configure the shadow-cljs middleware. Otherwise you won’t be able to switch between CLJ and CLJS REPLs.
project.clj(defproject my-amazing-project "1.0.0"
...
:repl-options
{:init-ns shadow.user ;; or any of your choosing
:nrepl-middleware
[shadow.cljs.devtools.server.nrepl/middleware]}
...)|
Tip
|
You still need to start the embedded server manually before using the CLJS REPL. |
5.4.2. Socket REPL
A Clojure Socket REPL is started automatically in server-mode and uses a random port by default. Tools can find the port it was started under by checking .shadow-cljs/socket-repl.port which will contain the port number.
You can also set a fixed port by via shadow-cljs.edn.
{...
 :socket-repl
 {:port 9000}
 ...}
The Socket REPL can be disabled by setting :socket-repl false.
5.4.3. SSL
The shadow-cljs HTTP servers support SSL. It requires a Java Keystore that provides a matching private key and certificate.
shadow-cljs.edn with SSL configured{...
:ssl {:keystore "ssl/keystore.jks"
:password "shadow-cljs"}
...}The above are the defaults so if you want to use those it is fine to just set :ssl {}.
You can create a Keystore using the java keytool command. Creating a trusted self-signed certificate is also possible but somewhat complicated.
-
OpenSSL instructions for Linux and Windows (via WSL)
The created Certificates.p12 (macOS) or localhost.pfx (Linux, Windows) file can be turned into the required keystore.jks via the keytool utility.
$ keytool -importkeystore -destkeystore keystore.jks -srcstoretype PKCS12 -srckeystore localhost.pfx|
Important
|
You must generate the Certificate with a SAN (Subject Alternative Name) for "localhost" (or whichever host you want to use). SAN is required to get Chrome to trust the Certificate and not show warnings. The password used when exporting must match the password assigned to the Keystore. |
5.4.4. Primary HTTP(S)
The shadow-cljs server starts one primary HTTP server. It is used to serve the UI and websockets used for Hot Reload and REPL clients. By default it listens on Port 9630. If that Port is in use it will increment by one and attempt again until an open Port is found.
shadow-cljs - server running at http://0.0.0.0:9630When :ssl is configured the server will be available via https:// instead.
|
Tip
|
The server automatically supports HTTP/2 when using :ssl.
|
If you prefer to set your own port instead you can do this via the :http config.
shadow-cljs.edn with :http config{...
:http {:port 12345
:host "my.machine.local"}
...}:ssl switches the server to server https:// only. If you want to keep the http:// version you can configure a separate :ssl-port as well.
{...
 :http {:port 12345
        :ssl-port 23456
        :host "localhost"}
 ...}
5.4.5. Development HTTP(S)
shadow-cljs can provide additional basic HTTP servers via the :dev-http config entry. By default these will serve all static files from the configured paths, and fall back to index.html when a resource is not found (this is what you typically want when developing an application which uses browser push state).
These servers are started automatically when shadow-cljs is running in server mode. They are not specific to any build and can be used to serve files for multiple builds as long as a unique :output-dir is used for each.
- IMPORTANT
-
These are just generic web servers that serve static files. They are not required for any live-reload or REPL logic. Any webserver will do, these are just provided for convenience.
public directory via http://localhost:8000{...
:dev-http {8000 "public"}
:builds {...}}:dev-http expects a map of port-number to config. The config supports several shortcuts for the most common scenarios.
:dev-http {8000 "public"}:dev-http {8000 "classpath:public"}This would attempt to find a request to /index.html via public/index.html on the classpath. Which may include files in .jar files.
:dev-http {8000 ["a" "b" "classpath:c"]}This would first attempt to find <project-root>/a/index.html then <project-root>/b/index.html then c/index.html on the classpath. If nothing is found the default handler will be called.
The longer config version expects a map and the supported options are:
:root-
(String) The path from which to serve requests. Paths starting with
classpath:will serve from the classpath instead of the filesystem. All filesystem paths are relative to the project root. :roots-
(Vector of Strings) If you need multiple root paths, use instead of
:root. :ssl-port-
When
:sslis configured use this port for ssl connections and server normal HTTP on the regular port. If:ssl-portis not set but:sslis configured the default port will only server SSL requests. :host-
Optional. The hostname to listen on. Defaults to localhost.
:handler-
Optional. A fully qualified symbol. A
(defn handler [req] resp)that is used if a resource is not found for the given request. Defaults toshadow.http.push-state/handle(this handler will only respond to requests withAccept: text/htmlheader.)
The following two options only apply when using the default, built-in handler and typically do not need to be changed:
:push-state/headers-
(optional) A map of HTTP headers to respond with. Defaults to
text/htmlstandard headers. :push-state/index-
(optional) The file to serve. Defaults to
index.html.
{...
 :dev-http
 {8080 {:root "public"
        :handler my.app/handler}}}
Reverse Proxy Support
By default the dev server will attempt to serve requests locally but sometimes you may want to use an external web server to serve requests (eg. API request). This can be configured via :proxy-url.
{...
 :dev-http
 {8000
  {:root "public"
   :proxy-url "https://some.host"}}}
A request going to http://localhost:8000/api/foo will serve the content returned by https://some.host/api/foo instead. All request that do not have a local file will be served by the proxied server.
Additional optional Options to configure the connection handling are:
:proxy-rewrite-host-header-
boolean, defaults to true. Determines whether the original Host header will be used or the one from the
:proxy-url.localhostvssome.hostusing the example above. :proxy-reuse-x-forwarded-
boolean, defaults to false. Configures if the proxy should add itself to
X-Forwarded-Forlist or start a new one. :proxy-max-connection-retries-
int, defaults to 1.
:proxy-max-request-time-
ms as int, defaults to 30000. 30sec request timeout.
5.5. JVM Configuration
When shadow-cljs.edn is used in charge of starting the JVM you can configure additional command line arguments to be passed directly to the JVM. For example you may want to decrease or increase the amount of RAM used by shadow-cljs.
This is done by configuring :jvm-opts at the root of shadow-cljs.edn expecting a vector of strings.
{:source-paths [...]
 :dependencies [...]
 :jvm-opts ["-Xmx1G"]
 :builds ...}
The arguments that can be passed to the JVM vary depending on the version but you can find an example list here. Please note that assigning too little or too much RAM can degrade performance. The defaults are usually good enough.
|
Important
|
When using deps.edn or project.clj the :jvm-opts need to be configured there.
|
6. Build Configuration
shadow-cljs.edn will also need a :builds section. Builds should be a map of builds keyed by build ID:
{:dependencies [[some-library "1.2.1"] ...]
 :source-paths ["src"]
 :builds
 {:app   {:target     :browser
          ... browser-specific options ...}
  :tests {:target :karma
          ... karma-specific options ...}}}
Each build describes artifacts that the compiler will build. The build target is an extensible feature of shadow-cljs, and the compiler comes with quite a few of them already.
6.1. Build Target
Each build in shadow-cljs must define a :target which defines where you intend your code to be executed. There are default built-ins for the browser and node.js. They all share the basic concept of having :dev and :release modes. :dev mode provides all the usual development goodies like fast compilation, live code reloading and a REPL. :release mode will produce optimized output intended for production.
Targets are covered in separate chapters.
Here are some of them:
:browser-
Output code suitable for running in a web browser.
:bootstrap-
Output code suitable for running in bootstrapped cljs environment.
:browser-test-
Scan for tests to determine required files, and output tests suitable for running in the browser.
:karma-
Scan for tests to determine required files, and output karma-runner compatible tests. See Karma.
:node-library-
Output code suitable for use as a node library.
:node-script-
Output code suitable for use as a node script.
:npm-module-
Output code suitable for use as an NPM module.
Each target is covered in more detail in its own chapter since the remaining build options vary on the target you select.
6.2. Development Options
Each build :target typically provides some development support. They are grouped under the :devtools key for each :build.
6.2.1. REPL
When running watch code for the REPL is injected automatically and usually does not require additional configuration. Additional options are available to control REPL behavior:
-
:repl-init-nsallows configuring which namespace the REPL will start in. It defaults tocljs.user. -
:repl-pprintmakes the REPL usecljs.pprintinstead of the regularpr-strwhen printing eval results. Defaults to false.
{...
 :builds
 {:app {...
        :devtools {:repl-init-ns my.app
                   :repl-pprint true
                   ...}}}}
6.2.2. Preloads
As a developer most of your time is spent in development mode. You’re probably familiar with tools like figwheel,
boot-reload, and devtools. It’s almost certain that you want one or more of these in your builds.
Preloads are used to force certain namespaces into the front of your generated Javascript. This is
generally used to inject tools and instrumentation before the application actually loads and runs. The
preloads option is simply a list of namespaces either in the :devtools/:preloads section of
shadow-cljs.edn or within the :preloads key of a specific module:
{...
 :builds
 {:app {...
        :devtools {:preloads [fulcro.inspect.preload]
                   ...}}}}
For example to only include the preloads within a main module during development, and not in a web worker:
{...
 :builds
 {:app {...
        :modules {:main {...
                         :preloads
                         [com.fulcrologic.fulcro.inspect.preload
                          com.fulcrologic.fulcro.inspect.dom-picker-preload]
                         :depends-on #{:shared}}
                  :shared {:entries []}
                  :web-worker {...
                    :depends-on #{:shared}
                    :web-worker true}}}}}
:preloads are only applied to development builds and will not be applied to release builds.
|
Note
|
Since version 2.0.130 shadow-cljs automatically adds cljs-devtools to the preloads in
watch and compile if they are on the classpath. All you need to do is make sure binaryage/devtools is in your
dependencies list. (Note, not binaryage/cljs-devtools.) If you don’t want to have cljs-devtools in
specific targets, you can suppress this by adding :console-support false to the :devtools section of
those targets.
|
6.2.3. Hot Code Reload
The React and ClojureScript ecosystems combine to make this kind of thing super useful. The shadow-cljs
system includes everything you need to do your hot code reload, without needing to resort to external tools.
In order to use it you simply run:
shadow-cljs watch build-idHot Reload of Transitive Dependents
By default, compiled files and files explicitly requiring those are reloaded. This approach may not be sufficient eg. during development for :react-native target. To reload also all transitive dependents, use :reload-strategy option with value :full as follows:
|
Important
|
This may become slow for larger apps, only use it if you really need it. |
{...
 :builds
 {:app
  {:target :react-native
   :init-fn some.app/init
   :output-dir "app"
   ...
   :devtools
   {:reload-strategy :full}}}}
6.2.4. Lifecycle Hooks
You can configure the compiler to run functions just before hot code reload brings in updated code, and just after. These are useful for stopping/starting things that would otherwise close over old code.
These can be configured via the :devtools section in your build config or directly in your code via metadata tags.
Metadata
You can set certain metadata on normal CLJS defn vars to inform the compiler that these functions should be called at a certain time when live reloading.
(ns my.app)

(defn ^:dev/before-load stop []
  (js/console.log "stop"))

(defn ^:dev/after-load start []
  (js/console.log "start"))
This would call my.app/stop before loading any new code and my.app/start when all new code was loaded. You can tag multiple functions like this and they will be called in dependency order of their namespaces.
There are also async variants of these in case you need to do some async work that should complete before proceeding with the reload process.
(ns my.app)

(defn ^:dev/before-load-async stop [done]
  (js/console.log "stop")
  (js/setTimeout
    (fn []
      (js/console.log "stop complete")
      (done)))

(defn ^:dev/after-load-async start [done]
  (js/console.log "start")
  (js/setTimeout
    (fn []
      (js/console.log "start complete")
(done)))|
Important
|
The functions will receive one callback function that must be called when their work is completed. If the callback function is not called the reload process will not proceed. |
It is possible to tag namespaces with metadata so they will never be reloaded even if they are recompiled.
(ns ^:dev/once my.thing)

(js/console.warn "will only execute once")
Namespaces can also be tagged to always reload.
(ns ^:dev/always my.thing)

(js/console.warn "will execute on every code change")
Config
In addition to the metadata you can configure the lifecycle hooks via shadow-cljs.edn.
:before-load-
A symbol (with namespace) of a function to run just before refreshing files that have been recompiled. This function must be synchronous in nature.
:before-load-async-
A symbol (with namespace) of a function
(fn [done])to run just before refreshing. This function can do async processing, but must call(done)to indicate it is complete. :after-load-
A symbol (with namespace) of a function to run after hot code reload is complete.
:after-load-async-
A symbol (with namespace) of a function
(fn [done])to run after hot code reload is complete. This function can do async processing, but must call(done)to indicate it is complete. :autoload-
A boolean controlling whether code should be hot loaded. Implicitly set to
trueif either of the callbacks is set. Always enabled for the:browsertarget by default, set tofalseto disable. :ignore-warnings-
A boolean controlling whether code with warnings should be reloaded. Defaults to
false.
{...
 :builds
 {:app {...
        :devtools {:before-load  my.app/stop
                   :after-load   my.app/start
...}}}}|
Important
|
Hooks cannot be declared in the cljs.user namespace. Hooks are only used if the namespace containing them is actually included in the build. If you use an extra namespace make sure to include it via :preloads.
|
|
Tip
|
If neither :after-load nor :before-load are set the compiler will only attempt to hot reload the code in the :browser target. If you still want hot reloading but don’t need any of the callbacks you can set :autoload true instead.
|
6.3. Build Hooks
It is sometimes desirable to execute some custom code at a specific stage in the compilation pipeline. :build-hooks let you declare which functions should be called and they have full access to the build state at that time. This is quite powerful and opens up many possible tool options.
They are configured per build under the :build-hooks key
{...
 :builds
 {:app {:target ...
        :build-hooks
        [(my.util/hook 1 2 3)]
...}}}}(ns my.util)
(defn hook
{:shadow.build/stage :flush}
[build-state & args]
(prn [:hello-world args])
build-state)This example would call (my.util/hook build-state 1 2 3) after the build completed the :flush stage (ie. written to disk). The example would print [:hello-world (1 2 3)] but please do something more useful in actual hooks.
The hook is a just a normal Clojure function with some additional metadata. The {:shadow.build/stage :flush} metadata informs the compiler to call this hook for :flush only. You may instead configure {:shadow.build/stages #{:configure :flush}} if the hook should be called after multiple stages. At least one configured stage is required since the hook otherwise would never do anything.
All build hooks will be called after the :target work is done. They will receive the build-state (a clojure map with all the current build data) as their first argument and must return this build-state modified or unmodified. When using multiple stages you can add additional data to the build-state that later stages can see. It is strongly advised to use namespaced keys only to ensure not accidentally breaking the entire build.
The build-state has some important entries which might be useful for your hooks:
-
:shadow.build/build-id- the id of the current build (eg.:app) -
:shadow.build/mode-:devor:release -
:shadow.build/stage- the current stage -
:shadow.build/config- the build config. You can either store config data for the hook in the build config directly or pass it as arguments in the hook itself
|
Important
|
With a running watch all hooks will be called repeatedly for each build. Avoid doing too much work as they can considerably impact your build performance.
|
6.3.1. Compilation Stages
The possible stages the :build-hooks can use are:
-
:configure- initial:targetspecific configuration -
:compile-prepare- called before any compilation is done -
:compile-finish- called after all compilation finishes -
:optimize-prepare- called before running the Closure Compiler optimization phase (:releaseonly) -
:optimize-finish- called after Closure is done (:releaseonly) -
:flush- called after everything was flushed to disk
With a running watch the :configure is only called once. Any of the others may be called
again (in order) for each re-compile. The build-state will be re-used until the build config changes at which point it will be thrown away and a fresh one will be created.
6.4. Compiler Cache
shadow-cljs will cache all compilation results by default. The cache is invalidated whenever anything relevant to the individual source files changes (eg. changed compiler setting, changed dependencies, etc.). This greatly improves the developer experience since incremental compilation will be much faster than starting from scratch.
Invalidating the cache however can not always be done reliably if you are using a lot of macros with side-effects (reading files, storing things outside the compiler state, etc.). In those cases you might need to disable caching entirely.
Namespaces that are known to include side-effecting macros can be blocked from caching. They won’t be cached themselves and namespaces requiring them will not be cached as well. The clara-rules library has side-effecting macros and is blocked by default. You can specify which namespaces to block globally via the :cache-blockers configuration. It expects a set of namespace symbols.
{...
 :cache-blockers #{clara.rules}
 :builds {...}}
In addition you can control how much caching is done more broadly via the :build-options :cache-level entry. The supported options are:
:all
|
The default, all CLJS files are cached |
:jars
|
Only caches files from libraries, ie. source files in |
:off
|
Does not cache any CLJS compilation results (by far the slowest option) |
{...
 :builds
 {:app
  {:target :browser
   ...
   :build-options
   {:cache-level :off}}}}
The cache files are stored in a dedicated directory for each build so the cache is never shared between builds. A build with the id :app will have the :dev cache in the directory:
cljs/core.cljstarget/shadow-cljs/builds/app/dev/ana/cljs/core.cljs.cache.transit.jsonThe :cache-root setting defaults to target/shadow-cljs and controls where ALL cache files will be written. It can only be configured globally, not per build.
{:source-paths [...]
 :dependencies [...]
 :cache-root ".shadow-cljs"
 :builds ...}

;; cache then goes to
;; .shadow-cljs/builds/app/dev/ana/cljs/core.cljs.cache.transit.json
The :cache-root is always resolved relative to the project directory. You can also specify absolute paths (eg. /tmp/shadow-cljs).
6.5. Closure Defines
The Closure Library & Compiler allow you to define variables that are essentially compile time constants. You can use these to configure certain features of your build. Since the Closure compiler treats these as constants when running :advanced optimizations they are fully supported in the Dead-Code-Elimination passes and can be used to remove certain parts of the code that should not be included in release builds.
You can define them in your code
(ns your.app)

(goog-define VERBOSE false)

(when VERBOSE
  (println "Hello World"))
This defines the your.app/VERBOSE variable as false by default. This will cause the println to be removed in :advanced compilation. You can toggle this to true via the :closure-defines options which will enable the println. This can either be done for development only or always.
{...
 :builds
 {:app
  {:target :browser
   ...
   :modules {:app {:entries [your.app]}}
   ;; to enable in development only
   :dev {:closure-defines {your.app/VERBOSE true}}
   ;; to enable always
   :closure-defines {your.app/VERBOSE true}
   ;; you may also enable it for release as well
   :release {:closure-defines {your.app/VERBOSE true}}
}}|
Tip
|
It is generally safer to use the "disabled" variant as the default since it makes things less likely to be included in a release build when they shouldn’t be. Forgetting to set a :closure-defines variable should almost always result in less code being used not more.
|
Closure Defines from the Closure Library
-
goog.DEBUG: The Closure Library uses this for many development features.shadow-cljsautomatically sets this tofalseforreleasebuilds. -
goog.LOCALEcan be used to configure certain localization features likegoog.i18n.DateTimeFormat. It accepts a standard locale string and defaults toen. Pretty much all locales are supported, see here and here.
6.6. Compiler Options
The CLJS compiler supports several options to influence how some code is generated. For the most part shadow-cljs will pick some good defaults for each :target but you might occasionally want to change some of them.
These are all grouped under the :compiler-options key in your build config.
{:dependencies [...]
 :builds
 {:app
  {:target :browser
   ...
   :compiler-options {:fn-invoke-direct true}}}}
Most of the standard ClojureScript Compiler Options are either enabled by default or do not apply. So very few of them actually have an effect. A lot of them are also specific to certain :target types and do not apply universally (e.g. :compiler-options {:output-wrapper true} is only relevant for :target :browser).
Currently supported options include
-
:optimizationssupports:advanced,:simpleor:whitespace, defaults to:advanced.:noneis the default for development and cannot be set manually.releasewith:nonewon’t work. -
:infer-externs:all,:auto,trueorfalse, defaults to:auto -
:static-fns(Boolean) defaults totrue -
:fn-invoke-direct(Boolean) defaults tofalse -
:elide-asserts(Boolean) default tofalsein development andtrueinreleasebuilds -
:pretty-printand:pseudo-namesdefault tofalse. You can useshadow-cljs release app --debugto enable both temporarily without touching your config. This is very useful when running into problem withreleasebuilds -
:source-map(Boolean) defaults totrueduring development,falseforrelease. -
:source-map-include-sources-content(Boolean) defaults totrueand decides whether source maps should contains their sources in the.mapfiles directly. -
:source-map-detail-level:allor:symbols(:symbolsreduces overall size a bit but also a bit less accurate) -
:externsvector of paths, defaults to[] -
:checked-arrays(Boolean), defaults tofalse -
:anon-fn-naming-policy -
:rename-prefixand:rename-prefix-namespace -
:warningsas a map of{warning-type true|false}, eg.:warnings {:undeclared-var false}to turn off specific warnings.
Unsupported or non-applicable Options
Options that don’t have any effect at all include
-
:verboseis controlled by runningshadow-cljs compile app --verbosenot in the build config. -
:foreign-libsand:libs -
:stable-namesalways enabled, cannot be disabled -
:install-deps -
:source-map-path,:source-asset-pathand:source-map-timestamp -
:cache-analysisalways enabled, cannot be disabled. -
:recompile-dependents -
:preamble -
:hashbang(the:node-scripttarget supports this, others don’t) -
:compiler-statsuse--verboseto get detailed information instead -
:optimize-constantsalways done forreleasebuilds, cannot be disabled -
:parallel-buildalways enabled -
:aot-cache -
:package-json-resolutionsee :js-options :resolve instead -
:watch-fn -
:process-shim
6.6.1. Warnings as Errors
It is sometimes desireable to fail a build with warnings rather than continuing with the build (eg. in CI envs). You can use the :warnings-as-errors compiler options to customize how that is handled.
{...
 :builds
 {:app
  {...
:compiler-options {:warnings-as-errors true}}}}{...
:builds
{:app
{...
:compiler-options {:warnings-as-errors #{:undeclared-var}}}}A set of possible warning-type keywords can be found here.
{...
 :builds
 {:app
  {...
   :compiler-options {:warnings-as-errors {:ignore #{some.ns some.library.*}
                                           :warnings-types #{:undeclared-var}}}
:ignore takes a set of symbols refering to namespaces. Either direct matches or .* wildcards are allowed. :warning-types has the same functionality as above, not specifying it means all warnings will throw except the ignored namespaces.
6.7. Output Language Options
By default the generated JS output will be compatible with ES6 and all "newer" features will be transpiled to compatible code using polyfills. This is currently the safest default and supports most browsers in active use (including IE10+).
You can select other output options if you only care about more modern environments and want to keep the original code without replacements (eg. node, Chrome Extensions, …)
|
Important
|
Note that this mostly affects imported JS code from npm or .js files from the classpath. CLJS will currently only generate ES5 output and is not affected by setting higher options.
|
You can configure this via the :output-feature-set in :compiler-options. The older :language-out option should not be used as :output-feature-set replaced it.
Supported options are:
-
:bare-minimum -
:es3 -
:es5 -
:es6-class,const,let, … -
:es7- exponent**operator -
:es8-async/await,generators, shared memory and atomics -
:es2018- async iteration,Promise.finally, severalRegExpfeatures, spread syntax in object literals -
:es2019 -
:es2020-AsyncIterator,BigInt,??operator, dynamic imports -
:es-next- all the features the Closure Compiler currently supports -
:browser-2020-:es2019minus several RegExp features -
:browser-2021-:es2020minus RegExp Unicode properties
{...
 :builds
 {:script
  {:target :node-script
   :main foo.bar/main
   ...
   :compiler-options {:output-feature-set :es7}}}}
Documentation on these options is a bit sparse and is mostly documented in the code here.
6.8. Conditional Reading
|
Caution
|
This feature only works in shadow-cljs. It was officially rejected by the ClojureScript project. It will still compile fine in CLJS but only the official branches work (e.g. :cljs). It might still be supported one day but as of now it is not.
|
shadow-cljs lets you configure additional reader features in .cljc files. By default you can only use reader conditionals to generate separate code for :clj, :cljs or :cljr. In many CLJS builds however it is also desirable to select which code is generated based on your :target.
Example: Some npm packages only work when targeting the :browser, but you may have a ns that you also want to use in a :node-script build. This might happen frequently when trying to use Server-Side Rendering (SSR) with your React App. codemirror is one such package.
(ns my.awesome.component
  (:require
    ["react" :as react]
    ["codemirror" :as CodeMirror]))

;; suppose you create a CodeMirror instance on some React :ref
(defn init-cm [dom-node]
  (let [cm (CodeMirror/fromTextArea dom-node #js {...})]
    ...))

...
This namespace will compile fine for both builds (:node-script and :browser) but when trying to run the :node-script it will fail since the codemirror package tries to access the DOM. Since react-dom/server does not use refs the init-cm function will never be called anyways.
While you can use :closure-defines to conditionally compile away the init-cm fn you can not use it to get rid of the extra :require. Reader conditionals let you do this easily.
(ns my.awesome.component
 (:require
   ["react" :as react]
   ;; NOTE: The order here matters. Only the first applicable
   ;; branch is used. If :cljs is used first it will still be
   ;; taken by the :server build
   #?@(:node [[]]
       :cljs [["codemirror" :as CodeMirror]])))

#?(:node ;; node platform override
   (defn init-cm [dom-node]
    :no-op)
   :cljs ;; default impl
   (defn init-cm [dom-node]
     ... actual impl ...))

...
:reader-features config examples{...
:builds
;; app build configured normally, no adjustments required
{:app
{:target :browser
...}
;; for the server we add the :node reader feature
;; it will then be used instead of the default :cljs
:server
{:target :node-script
:compiler-options
{:reader-features #{:node}}}}}The :server build will then no longer have the codemirror require and the init-cm function is removed. Becoming only
(ns my.awesome.component
  (:require
    ["react" :as react]))

;; this will likely be removed as dead code if
;; its never actually called anywhere

(defn init-cm [dom-node] :no-op)
...|
Important
|
This feature is only available in .cljc files and will fail in .cljs files.
|
6.9. Overriding from the CLI
It is sometimes desirable to make small adjustments to the build configuration from the command line with values that can’t be added statically to the shadow-cljs.edn config or may change depending on the environment you are in.
You can pass additional config data via the --config-merge {:some "data"} command line option which will be merged into the build config. Data added from the CLI will override data from the shadow-cljs.edn file.
shadow-cljs.edn config{...
:builds
{:app
{:target :browser
:output-dir "public/js"
...}}}:output-dir from the CLI$ shadow-cljs release app --config-merge '{:output-dir "somewhere/else"}':closure-defines from the CLI$ shadow-cljs release app --config-merge '{:closure-defines {your.app/DEBUG true}}'--config-merge expects one EDN map and can be used multiple times, they will be merged left to right. The data added is also visible to build-hooks. It will also accept a file path like --config-merge a/path.edn or --config-merge classpath:a/resource.edn.
|
Important
|
If you specify multiple build ids the data will be merged into all specified builds. shadow-cljs release frontend backend --config-merge '{:hello "world"}' will be applied to both.
|
6.10. Using Environment Variables
It is possible to use environment variables to set configuration values in shadow-cljs.edn but you should consider using --config-merge instead. If you really must use an environment variable you can do so via the #shadow/env "FOO" reader tag. You can also use the shorter #env.
shadow-cljs.edn config{...
:builds
{:app
{:target :browser
:output-dir "public/js"
:closure-defines {your.app/URL #shadow/env "APP_URL"}
...}}}The are also a few more supported forms that you can use #shadow/env with.
#shadow/env "APP_URL"
#shadow/env ["APP_URL"]
;; with default value, used if env variable is not set
#shadow/env ["APP_URL" "default-value"]
#shadow/env ["APP_URL" :default "default-value"]
;; turn PORT env into an integer, with default
#shadow/env ["PORT" :as :int :default 8080]
Supported :as coercions are :int, :bool, :keyword, :symbol. Supplied :default values will not be converted and are expected to be in the correct type already.
|
Important
|
The environment variables used when the shadow-cljs process was started are used. If a server process is used its environment variables will be used over those potentially set by other commands. This is mostly relevant during development but may be confusing. --config-merge does not have this limitation.
|
6.11. Build and Target defaults
It is possible to use set defaults that will be used for all builds, or for all targets of a certain type.
Configuration merge order is as follows :build-defaults → :target-defaults → actual build config → extra config overrides.
shadow-cljs.edn config{...
:build-defaults
{:closure-defines
{your.app/VERBOSE true}}
:target-defaults
{:browser
{:js-options
{:resolve {"react" {:target :global
:global "React"}}}}}
:builds
{:app
{:target :browser
...}}}In this example the :app target will inherit both :build-defaults and the :target-defaults for :browser.
|
Important
|
Configs later in the merge order can override, but not remove previous configuration items. Once a default is set, the only way to remove it is by overriding it. |
7. Targeting the Browser
The :browser target produces output intended to run in a Browser environment. During development it supports live code reloading, REPL, CSS reloading. The release output will be minified by the Closure Compiler with :advanced optimizations.
A basic browser configuration looks like this:
{:dependencies [...]
 :source-paths [...]

 :builds
 {:app {:target :browser
        :output-dir "public/assets/app/js"
        :asset-path "/assets/app/js"
        :modules {:main {:entries [my.app]}}}}}
7.1. Output Settings
The browser target outputs a lot of files, and a directory is needed for them all. You’ll need to serve these assets with some kind of server, and the Javascript loading code needs to know the server-centric path to these assets. The options you need to specify are:
:output-dir-
The directory to use for all compiler output.
:asset-path-
The relative path from web server’s root to the resources in
:output-dir.
Your entry point javascript file and all related JS files will appear in :output-dir.
|
Warning
|
Each build requires its own :output-dir, you may not put multiple builds into the same directory.
This directory should also be exclusively owned by the build. There should be no other files in there.
While shadow-cljs won’t delete anything it is safer to leave it alone. Compilation
creates many more files than just the main entry point javascript file during development:
source maps, original sources, and generated sources.
|
The :asset-path is a prefix that gets added to the paths of module loading code inside of the
generated javascript. It allows you to output your javascript module to a particular subdirectory
of your web server’s root. The dynamic loading during development (hot code reload) and production
(code splitting) need this to correctly locate files.
Locating your generated files in a directory and asset path like this make it so that other assets (images, css, etc.) can easily co-exist on the same server without accidental collisions.
For example: if your web server will serve the folder public/x when asked for the URI /x,
and your output-dir for a module is public/assets/app/js then your asset-path should be /assets/app/js.
You are not required to use an absolute asset path, but it is highly recommended.
7.2. Modules
Modules configure how the compiled sources are bundled together and how the final .js are generated. Each Module declares a list of Entry Namespace and from that dependency graph is built. When using multiple Modules the code is split so that the maximum amount of code is moved to the outer edges of the graph. The goal is to minimize the amount of code the browser has to load initially and loading the rest on-demand.
|
Tip
|
Don’t worry too much about :modules in the beginning. Start with one and split them later. |
The :modules section of the config is always a map keyed by module ID. The module ID is also used
to generate the Javascript filename. Module :main will generate main.js in :output-dir.
The available options in a module are:
:entries
|
The namespaces that serve as the root nodes of the dependency graph for the output code of this module. |
:init-fn
|
Fully qualified symbol pointing to a function that should be called when the module is loaded initially. |
:depends-on
|
The names of other modules that must be loaded in order for this one to have everything it needs. |
:prepend
|
String content that will be prepended to the js output. Useful for comments, copyright notice, etc. |
:append
|
String content that will be appended to the js output. Useful for comments, copyright notice, etc. |
:prepend-js
|
A string to prepend to the module output containing valid javascript that will be run through Closure optimizer. |
:append-js
|
A string to append to the module output containing valid javascript that will be run through Closure optimizer. |
The following example shows a minimum module configuration:
{...
 :builds
 {:app {:target :browser
        :output-dir "public/js"
        ...
:modules {:main {:entries [my.app]}}}}}{...
:builds
{:app {:target :browser
:output-dir "public/js"
...
:modules {:main {:init-fn my.app/init}}}}}shadow-cljs will follow the dependency graph from the root set of code entry points in the :entries
to find everything needed to actually compile and include in the output. Namespaces that are not required will not be included.
The above config will create a public/js/main.js file. During development there will be an additional public/js/cljs-runtime directory with lots of files. This directory is not required for release builds.
7.3. Code Splitting
Declaring more than one Module requires a tiny bit of additional static configuration so the Compiler can figure out how the Modules are related to each other and how you will be loading them later.
In addition to :entries you’ll need to declare which module depends on which (via :depends-on). How you structure this is entirely up to your needs and there is no one-size-fits-all solution unfortunately.
Say you have a traditional website with actual different pages.
-
www.acme.com- serving the homepage -
www.acme.com/login- serving the login form -
www.acme.com/protected- protected section that is only available once the user is logged in
One possible configuration for this would be to have one common module that is shared between all the pages. Then one for each page.
:modules{...
:output-dir "public/js"
:modules
{:shared
{:entries [my.app.common]}
:home
{:entries [my.app.home]
:depends-on #{:shared}}
:login
{:entries [my.app.login]
:depends-on #{:shared}}
:protected
{:entries [my.app.protected]
:depends-on #{:shared}}|
Tip
|
You can leave the :entries of the :shared module empty to let the compiler figure out which namespaces are shared between the other modules.
|
.
└── public
    └── js
        ├── shared.js
        ├── home.js
        ├── login.js
        └── protected.js
In your HTML for the Homepage you’d then always include the shared.js on each page and the others conditionally depending on which page the user is on.
/login page<script src="/js/shared.js"></script>
<script src="/js/login.js"></script>|
Important
|
The .js files must be included in the correct order. The manifest.edn can help with this.
|
7.3.1. Loading code dynamically
The more dynamic your website gets, the more dynamic your requirements may get. The server may not always know what the client may end up needing. Therefore, it is possible to have the client load code dynamically when needed.
There are a couple ways of loading code dynamically. shadow.lazy is the most convenient and easiest.
Using shadow.lazy
As announced here shadow-cljs provides a convenience method for referring to potentially lazy loaded code.
(ns demo.app
  (:require
    [shadow.lazy :as lazy]
    [shadow.cljs.modern :refer (js-await)]))

(def x-lazy (lazy/loadable demo.thing/x))

(defn on-event [e]
  (js-await [x (lazy/load x-lazy)]
    (x e)))
Let’s assume that the on-event function above is called when something in your app happens, for example when the user clicked a button. The lazy/loadable configured what that thing will be. The lazy/load will actually load it. This may require an async network hop, so it will go async at this point. In the body of the js-await above x will be whatever demo.thing/x was at the time of loading it.
(ns demo.thing)
(defn x [e]
  "hello world")
In this case it would be the function, which we can call directly.
You do not need to worry about specifying which module this code ended up in. The compiler will figure that out during compilation. The loadable macro also allows more complex references.
(def xy (lazy/loadable [demo.thing/x demo.other/y]))

(def xym (lazy/loadable {:x demo.thing/x
                         :y demo.other/y}))
If you load xy the result will be a vector with two things. If you load xym it’ll be a map. You may include vars that span multiple modules that way. The loader will ensure all modules are loaded before continuing.
Using shadow-cljs’s built-in Loader Support
|
Important
|
This is the low level version, which the above is built upoin. Use it if you want to build your own abstraction for async loading. The above is much more convenient to use. |
The compiler supports generating the required data for using the shadow.loader utility namespace. It exposes a simple interface to let you load modules on-demand at runtime.
You only need to add :module-loader true to your build config. The loader will always be injected into the default module (the one everything else depends on).
At runtime you may use the shadow.loader namespace to load modules. You may also still load a module eagerly by just using a <script> tag in your page.
{...
 :builds
   {:app
     {:target :browser
      ...
      :module-loader true
      :modules {:main  {:entries [my.app]}
                :extra {:entries [my.app.extra]
                        :depends-on #{:main}}}}}}
If you had the following for your main entry point:
(ns my.app
  (:require [shadow.loader :as loader]))

(defn fn-to-call-on-load []
  (js/console.log "extra loaded"))

(defn fn-to-call-on-error []
  (js/console.log "extra load failed"))
Then the following expressions can be used for loading code:
;; load returns a goog.async.Deferred, and can be used like a promise
(-> (loader/load "extra")
(.then fn-to-call-on-load fn-to-call-on-error));; must be a JS array, also returns goog.async.Deferred
(loader/load-many #js ["foo" "bar"])(loader/with-module "extra" fn-to-call-on-load)You can check if a module is loaded using (loaded? "module-name").
You can read more about a more practical example in this blog post about Code-Splitting ClojureScript. This is only a basic overview.
Loader Costs
Using the loader is very lightweight. It has a few dependencies which you may not be otherwise using. In practice using :module-loader true adds about 8KB gzip’d to the default module. This will vary depending on how much of goog.net and goog.events you are already using, and what level of optimization you use for your release builds.
Using the Standard ClojureScript API
The generated code is capable of using the standard ClojureScript cljs.loader API. See the documentation on the ClojureScript website for instructions.
The advantage of using the standard API is that your code will play well with others. This may be of particular importance to library authors. The disadvantage is that the dynamic module loading API in the standard distribution is currently somewhat less easy-to-use than the support in shadow-cljs.
7.4. Output Wrapper
Release builds only: The code generated by the Closure Compiler :advanced compilation will create a lot of global variables which has the potential to create conflicts with other JS running in your page. To isolate the created variables the code can be wrapped in an anonymous function to the variables only apply in that scope.
release builds for :browser with only one :modules are wrapped in (function(){<the-code>}).call(this); by default. So no global variables are created.
When using multiple :modules (a.k.a code splitting) this is not enabled by default since each module must be able to access the variables created by the modules it depends on. The Closure Compiler supports an additional option to enable the use of an output wrapper in combination with multiple :modules named :rename-prefix-namespace. This will cause the Compiler to scope all "global" variables used by the build into one actual global variable. By default this is set to :rename-prefix-namespace "$APP" when :output-wrapper is set to true.
{...
 :builds
 {:target :browser
  ...
  :compiler-options
  {:output-wrapper true
   :rename-prefix-namespace "MY_APP"}}}
This will only create the MY_APP global variable. Since every "global" variable will now be prefixed by MY_APP. (e.g. MY_APP.a instead of just a) the code size can go up substantially. It is important to keep this short. Browser compression (e.g. gzip) helps reduce the overhead of the extra code but depending on the amount of global variables in your build this can still produce a noticeable increase.
|
Important
|
Note that the created variable isn’t actually useful directly. It will contain a lot of munged/minified properties. All exported (eg. ^:export) variables will still be exported into the global scope and are not affect by this setting. The setting only serves to limit the amount of global variables created, nothing else. Do not use it directly.
|
7.5. Web Workers
The :modules configuration may also be used to generate files intended to be used as a Web Workers.
You may declare any module as a Web Worker by setting :web-worker true. The
generated file will contain some additional bootstrap code which will load its dependencies
automatically. The way :modules work also ensures that code used only by the worker will also only
be in the final file for the worker. Each worker should have a dedicated CLJS namespace.
{...
 :builds
 {:app
  {:target :browser
   :output-dir "public/js"
   :asset-path "/js"
   ...
   :modules
   {:shared
    {:entries []}
    :main
    {:init-fn my.app/init
     :depends-on #{:shared}}
    :worker
    {:init-fn my.app.worker/init
     :depends-on #{:shared}
     :web-worker true}}
   }}}
The above configuration will generate worker.js which you can use to start the Web Worker.
It will have all code from the :shared module available (but not :main). The code in the
my.app.worker namespace will only ever execute in the worker. Worker generation happens in
both development and release modes.
Note that the empty :entries [] in the :shared module will make it collect all the code shared between the :main and :worker modules.
(ns my.app.worker)

(defn init []
  (js/self.addEventListener "message"
    (fn [^js e]
(js/postMessage (.. e -data)))))(ns my.app)
(defn init []
(let [worker (js/Worker. "/js/worker.js")]
(.. worker (addEventListener "message" (fn [e] (js/console.log e))))
(.. worker (postMessage "hello world"))))|
Important
|
Since we now have a :shared module you must ensure to load it properly in your HTML. If you just load main.js you will get an error.
|
<script src="/js/shared.js"></script>
<script src="/js/main.js"></script>
7.6. Cacheable Output
In a web setting it is desirable to cache .js files for a very long time to avoid extra request. It is common
practice the generate a unique name for the .js file for every released version. This changes the URL used to
access it and thereby is safe to cache forever.
7.6.1. Release Versions
Creating unique filenames for each release can be done via the :release-version config setting. Generally you’ll pass this in from the command line via --config-merge.
shadow-cljs release app --config-merge '{:release-version "v1"}'{...
:builds
{:app
{:target :browser
...
:output-dir "public/js"
:asset-path "/js"
:modules {:main {:entries [my.app]}
:extra {:entries [my.app.extra]
:depends-on #{:main}}}}}}This would create the main.v1.js and extra.v1.js files in public/js instead of the usual main.js and extra.js.
You can use manual versions or something automated like the git sha at the time of the build. Just make sure that you bump whatever it is once you shipped something out to the user since with caching they won’t be requesting newer versions of old files.
7.6.2. Filenames with Fingerprint-Hash
You can add :module-hash-names true to your build config to automatically create a MD5
signature for each generated output module file. That means that a :main module will generate
a main.<md5hash>.js instead of just the default main.js.
:module-hash-names true will include the full 32-length md5 hash, if you prefer a shorter version you can specify a
number between 1-32 instead (eg. :module-hash-names 8). Be aware that shortening the hash may increase the chances
of generating conflicts. I recommend using the full hash.
{...
 :builds
   {:app
     {:target :browser
      ...
      :output-dir "public/js"
      :asset-path "/js"
      :module-hash-names true
      :modules {:main  {:entries [my.app]}
                :extra {:entries [my.app.extra]
                        :depends-on #{:main}}}}}}
Instead of generating main.js it will now generate main.<hash>.js in the :output-dir.
Since the filename can change with every release it gets a little bit more complicated to include them in your HTML. If you want to accomplish this with a program external to shadow-cljs, you can find programmatic information about filenames in the Output Manifest. If you want to accomplish this as part of the build, have a look at Build Hooks, and at this hook specifically for inspiration.
7.7. Output Manifest
shadow-cljs generates a manifest.edn file in the configured :output-dir.
This file contains a description of the module config together with an extra :output-name property which
maps the original module name to actual filename (important when using the :module-hash-names feature).
[{:module-id :common,
  :name :common,
  :output-name "common.15D142F7841E2838B46283EA558634EE.js",
  :entries [...],
  :depends-on #{},
  :sources [...]}
 {:module-id :page-a,
  :name :page-a,
  :output-name "page-a.D8844E305644135CBD5CBCF7E359168A.js",
  :entries [...],
  :depends-on #{:common},
  :sources [...]}
 ...]
The manifest contains all :modules sorted in dependency order. You can use it to map the :module-id back to the
actual generated filename.
Development builds also produce this file and you may check if for modifications to
know when a new build completed. :module-hash-names does not apply during development so you’ll get the usual
filenames.
You can configure the name of the generated manifest file via the :build-options :manifest-name entry. It defaults to
manifest.edn. If you configure a filename with .json ending the output will be JSON instead of EDN. The file will
be relative to the configured :output-dir.
{...
 :builds
   {:app
     {:target :browser
      ...
      :build-options {:manifest-name "manifest.json"}
      :modules {:main  {:entries [my.app]}
                :extra {:entries [my.app.extra]
                        :depends-on #{:main}}}}}}
7.8. Development Support
The :devtools section of the configuration for :browser supports a few additional
options for configuring an optional dev-time HTTP server for a build and CSS reloading.
7.8.1. Heads-Up Display (HUD)
The :browser target now uses a HUD to display a loading indicator when a build is started. It will also display warnings and errors if there are any.
You can disable it completely by setting :hud false in the :devtools section.
You may also toggle certain features by specifying which features you care about via setting :hud #{:errors :warnings}. This will show errors/warnings but no progress indicator. Available options are :errors, :warnings, :progress. Only options included will be enabled, all other will be disabled.
Opening Files
Warnings include a link to source location which can be clicked to open the file in your editor. For this a little bit of config is required.
You can either configure this in your shadow-cljs.edn config for the project or globally in your home directory under ~/.shadow-cljs/config.edn.
:open-file-command configuration{:open-file-command
["idea" :pwd "--line" :line :file]}The :open-file-command expects a vector representing a very simple DSL. Strings are kept as they are and keyword are replaced by their respective values. A nested vector can be used in case you need to combine multiple params, using clojure.core/format style pattern.
The above example would execute
$ idea /path/to/project-root --line 3 /path/to/project-root/src/main/demo/foo.cljsemacsclient example{:open-file-command
["emacsclient" "-n" ["+%s:%s" :line :column] :file]}$ emacsclient -n +3:1 /path/to/project-root/src/main/demo/foo.cljsThe available replacement variables are:
:pwd-
Process Working Directory (aka project root)
:file-
Absolute File Path
:line-
Line Number of Warning/Error
:column-
Column Number
:wsl-file-
Translated WSL file path. Useful when running
shadow-cljsvia WSL Bash. Translates a/mnt/c/Users/someone/code/project/src/main/demo/foo.cljspath intoC:\Users... :wsl-pwd-
Translated
:pwd
7.8.2. CSS Reloading
The Browser devtools can also reload CSS for you. This is enabled by default and in most cases requires no additional configuration when you are using the built-in development HTTP servers.
Any stylesheet included in a page will be reloaded if modified on the filesystem. Prefer using absolute paths but relative paths should work as well.
<link rel="stylesheet" href="/css/main.css"/>[:link {:rel "stylesheet" :href "/css/main.css"}]:dev-http {8000 "public"}This will cause the browser to reload /css/main.css when public/css/main.css is changed.
shadow-cljs currently provides no support for directly compiling CSS but the usual tools will work and should
be run separately. Just make sure the output is generated into the correct places.
When you are not using the built-in HTTP Server you can specify :watch-dir instead which should be a path to the
document root used to serve your content.
{...
    {:builds
      {:app {...
             :devtools {:watch-dir "public"}}}}
When your HTTP Server is serving the files from a virtual directory and the filesystem paths don’t exactly match the path used in the HTML you may adjust the path by setting :watch-path which will be used as a prefix.
public/css/main.css being served under /foo/css/main.css{...
{:builds
{:app
{...
:devtools {:watch-dir "public"
:watch-path "/foo"}}}}7.8.3. Proxy Support
By default the devtools client will attempt to connect to the shadow-cljs process via the configured HTTP server (usually localhost). If you are using a reverse proxy to serve your HTML that might not be possible. You can set :devtools-url to configure which URL to use.
{...
 :builds
 {:app {...
        :devtools {:before-load  my.app/stop
                   :after-load   my.app/start
                   :devtools-url "https://some.host/shadow-cljs"
                   ...}}}}
shadow-cljs will then use the :devtools-url as the base when making requests. It is not the final URL so you must ensure that all requests starting with the path you configured (eg. /shadow-cljs/*) are forwarded to the host shadow-cljs is running on.
https://some.host/shadow-cljs/ws/foo/bar?asdfhttp://localhost:9630/foo/bar?asdfThe client will make WebSocket request as well as normal XHR requests to load files. Ensure that your proxy properly upgrades WebSockets.
|
Important
|
The requests must be forwarded to the main HTTP server, not the one configured in the build itself. |
7.9. Using External JS Bundlers
Sometimes npm packages you may wish to use may use features that shadow-cljs itself does not support. Some packages are even written with the explicit expectation to be processed by webpack. In these cases it might be simpler to just use webpack (or similar), instead of letting shadow-cljs try to bundle those packages and working arround the issues that may occur.
shadow-cljs supports an option to let it focus on compiling CLJS code, but let something else process the npm/JS requires. You can do so via :js-provider :external. I wrote more on this subject in this blogpost.
|
Important
|
This will limit certain dynamic interaction. Adding new npm requires will require reloading the page, since they can no longer be hot-loaded in by shadow-cljs. Requiring npm packages at the REPL will also be limited to those already provided by the external JS file. Which often is not a big deal, but something to be aware of. |
In your build config you add:
{:builds
 {:app
  {:target :browser
   :output-dir "..."
   :modules {:main {...}}
   :js-options
   {:js-provider :external
    :external-index "target/index.js"}}}}
shadow-cljs will then just output all required npm package requires in a format that regular JS tools can understand. You’ll then need to run webpack (or similar) manually, and include the output of that build separately from the shadow-cljs output.
So, instead of just including one script tag in your HTML, you include two.
<script defer src="/js/libs.js"></script>
<script defer src="/js/main.js"></script>
With libs.js here presuming to be the output of webpack.
|
Important
|
Note that webpack (or similar) sometimes output more than one file, so which exactly you need to include may depend on how you built everything. Please consult their documentation for more details. The only important part as far as shadow-cljs is concerned that the external output is loaded before the shadow-cljs output.
|
7.9.1. JS Tree Shaking
Tools like webpack can potentially tree-shake npm dependencies to make their build output smaller. For this the :external-index file needs to generate ESM code, instead of the current default CommonJS, i.e. require().
{:builds
 {:app
  {:target :browser
   :output-dir "..."
   :modules {:main {...}}
   :js-options
   {:js-provider :external
    :external-index "target/index.js"
    :external-index-format :esm}}}}
This will only use import in the :external-index file. For release builds this file will list all the referenced imports, for watch/compile it’ll still reference everything.
8. Targeting JavaScript Modules
The :target :esm emits files that can be used in any ESM environment.
ESM, short for ECMAscript Modules, or just JavaScript Modules, is the modernized standard for JavaScript files. Most modern platforms support this out of the box, and more and more of the JS ecosystem is moving this way. Each Module generated this way can specify "exports" which other files importing this can reference.
ESM much like the :target :browser is driven by the :modules config option. Each module can declare its :exports for others to access.
As with other modes the main configuration options apply and can be set. The additional target-specific options are:
:output-dir
|
(optional, default |
:runtime
|
(optional , default |
:modules
|
required, a map of keyword to module configuration |
8.1. Module Configuration
Each module has its own set of options that control how the module is constructed. Specifying multiple modules will mean that the code is split between them.
:init-fn
|
optional, a |
:entries
|
optional, a vector of namespace symbols to load in this module |
:exports
|
required, a map of symbol to fully qualified symbols |
:depends-on
|
required when using multiple |
8.1.1. Module Exports
Controlling what code is actually exported is done via :exports.
{:source-paths ["src/main"]
 :dev-http {8000 "public"}
 :builds
 {:app
  {:target :esm
   :output-dir "public/js"
   :modules {:demo {:exports {hello demo.lib/hello}}}}}}
This will generate the public/js/demo.js file. The name is decided by taking the :output-dir and combining it with the key :demo in the :modules map.
(ns demo.lib)

(defn hello []
  (js/console.og "hello world"))

(defn not-exported []
  (js/console.log "foo"))
It will be loadable directly in any ESM environment. For example the Browser. Putting this into a public/index.html and loading it via http://localhost:8000.
<script type="module">
  import { hello } from "/js/demo.js";
  hello();
</script>
With npx shadow-cljs watch app you should see the hello world logged to the browser console when loading the page.
Note that only hello is accessible here since it was declared in the :exports. The (defn not-exported [] …) will not be accessible and will most likely be removed entirely in :advanced release builds.
Module Default Exports
ES Module have this one "special" default export, which you’ll often see used in JS examples. This can be expressed by defining the default exports like any other.
{:source-paths ["src/main"]
 :dev-http {8000 "public"}
 :builds
 {:app
  {:target :esm
   :output-dir "public/js"
   :modules {:demo {:exports {default demo.lib/hello}}}}}}
And the import side changing to
<script type="module">
  import hello from "/js/demo.js";
  hello();
</script>
Many platforms or systems apply special meaning to this default export, but it is declared like any other in the build config.
Module :init-fn
Sometimes you may not require any :exports and instead just want the code to run automatically when the module is loaded. This can be done via :init-fn.
{:source-paths ["src/main"]
 :dev-http {8000 "public"}
 :builds
 {:app
  {:target :esm
   :output-dir "public/js"
   :modules {:demo {:init-fn demo.lib/hello}}}}}
And the HTML
<script type="module" src="js/demo.js"></script>In can also be combined with :exports to run a function and still provide :exports
{:source-paths ["src/main"]
 :dev-http {8000 "public"}
 :builds
 {:app
  {:target :esm
   :output-dir "public/js"
   :modules
   {:demo
    {:init-fn demo.lib/hello
     :exports {hello demo.lib/hello}}}}}}
Keeping this HTML will essentially just log twice on page load.
<script type="module">
  import hello from "/js/demo.js";
  hello();
</script>
8.2. Module Splitting
{:source-paths ["src/main"]
 :dev-http {8000 "public"}
 :builds
 {:app
  {:target :esm
   :output-dir "public/js"
   :modules
   {:base
    {:entries []}
    :hello
    {:exports {hello demo.lib/hello}
     :depends-on #{:base}}
    :other
    {:exports {foo demo.foo/foo}
     :depends-on #{:base}}
    }}}}
And adding
(ns demo.foo)

(defn foo []
  (js/console.log "foo"))
Here we declare 3 modules with one :base module and two other modules which both depend on the :base module. The :base module declared an empty :entries [] vector which is a convenience to say that it should extract all the namespaces that both of the other modules share (eg. cljs.core in this case).
You may now load each :module independently in the HTML.
<script type="module">
  import hello from "/js/hello.js";
  hello();
</script>
The browser will automatically load the /js/base.js as well, but not the /js/other.js as the code above doesn’t need it. You can use :modules to split code for separate sections of your website for example.
8.3. Dynamic Module Import
Modules can also be loaded dynamically at runtime via the provided shadow.esm/dynamic-import helper.
(ns my.app
  (:require
    [shadow.esm :refer (dynamic-import)]
    [shadow.cljs.modern :refer (js-await)]))

(defn foo []
  (js-await [mod (dynamic-import "https://cdn.pika.dev/preact@^10.0.0")]
    (js/console.log "loaded module" mod)))
This would load an external ESM module dynamically at runtime without it ever being part of the build. You can of course also load your own :modules dynamically this way too.
8.4. Third Party Tool Integration
In the default :runtime :browser setup all dependencies are bundled and provided by shadow-cljs. This is done so the output is directly loadable in the Browser. When importing the :target :esm output into another build tool environment (eg. webpack) that may lead to duplicated dependencies.
Instead, you can configure shadow-cljs to not bundle any JS dependencies and instead leave that to the other tool.
This is done by setting :js-provider in your build config.
{:source-paths ["src/main"]
 :dev-http {8000 "public"}
 :builds
 {:app
  {:target :esm
   :output-dir "public/js"
   :js-options {:js-provider :import}
   :modules {:demo {:exports {default demo.lib/hello}}}}}}
For this build shadow-cljs will only compile and bundle CLJS code, but leave all other JS code to be provided by some other tool later. Note that if you have (:require ["react"]) or any other npm dependency in your build the output from shadow-cljs MUST be processed by another tool first before it becomes loadable in the Browser. Only set this if some other tool is actually going to provide the required dependencies.
9. Targeting React Native
The :target :react-native produces code that is meant to integrate into the default react-native tooling (eg. metro). Tools like expo which wrap those tools should automatically work and require no additional setup.
You will need the same basic main configuration as in other targets (like
:source-paths), the build specific config is very minimal and requires at least 2 options (besides :target itself)
:init-fn
|
(required). The namespace-qualified symbol of your apps init function. This function will be called once on startup and should probably render something. |
:output-dir
|
(required). The directory used to write output files. |
{:source-paths [...]
 :dependencies [...]
 ...
 :builds
 {:app
  {:target :react-native
   :init-fn demo.app/init
   :output-dir "app"}}}
When compiled this results in a app/index.js file intended to be used as an entry point for the react-native tools. During development the :output-dir will contain many more files but you should only reference the generated app/index.js directly. A release build will only generate the optimized app/index.js and requires no additional files.
9.1. React Native
There are two ways to use react-native, "plain" react-native, which allows you to use native code and libraries and the one "wrapped" in expo (described below). All the steps described above are sufficient to start using shadow-cljs with the plain react-native. See this example repo:
9.2. Expo
expo makes working with react-native quite easy. There are two provided example setups.
Both examples were generated using expo init … and the only adjusted change in the config was adding the proper entryPoint to the generated app.json.
{
  "expo": {
    "name": "hello-world",
    "slug": "reagent-expo",
    ...
    "entryPoint":"./app/index.js",
    ...
  }
}
expo requires that a React Component is registered on startup which can be done manually or by using the shadow.expo/render-root function which takes care of creating the Component and instead directly expects a React Element instance to start rendering.
(defn start
  {:dev/after-load true}
  []
  (expo/render-root (r/as-element [root])))

(defn init []
  (start))
init is called once on startup. Since the example doesn’t need to do any special setup it just calls start directly. start will be called repeatedly when watch is running each time after the code changes were reloaded. The reagent.core/as-element function can be used to generate the required React Element from the reagent hiccup markup.
9.3. Hot Code Reload
React native requires to reload not only compiled files and files explicitly requiring those, but also their transitive dependents, for changes to take effect. To accomplish this, use :reload-strategy option as in Hot Reload of Transitive Dependents.
10. Targeting node.js
There is built-in support for generating code that is intended to be used as a stand-alone script, and also for code that is intended to be used as a library. See the section on common configuration for the base settings needed in a configuration file.
10.1. node.js Scripts
The :target :node-script produces single-file stand-alone output that can be run using node.js.
The code is just ClojureScript, and an entry point is easy to define:
(ns demo.script)

(defn main [& cli-args]
  (prn "hello world"))
10.1.1. Build Options
You will need the same basic main configuration as in other targets (like
:source-paths), but you’ll need some node-specific build target options:
:main
|
(required). The namespace-qualified symbol of your script’s entry point function. |
:output-to
|
(required). The path and filename for the generated script. |
:output-dir
|
(optional). The path for supporting files in development mode. Defaults to a cache directory. |
{:source-paths [...]
 ...
 :builds
 {:script
  {:target :node-script
   :main demo.script/main
   :output-to "out/demo-script/script.js"}}}
When compiled this results in a standalone out/demo-script/script.js file intended to be called
via node script.js <command line args>. When run it will call (demo.script/main <command line args>)
function on startup. This only ever produces the file specified in :output-to. Any other support files
(e.g. for development mode) are written to a temporary support directory.
10.1.2. Hot Code Reload
You will often write scripts that run as servers or some other long-running process. Hot code reload can be quite useful when working with these, and it is simple to set up:
-
Add start/stop callback functions.
-
Configure the build use those hooks.
Here is an example http server in node:
(ns demo.script
  (:require ["http" :as http]))

(defn request-handler [req res]
  (.end res "foo"))

; a place to hang onto the server so we can stop/start it
(defonce server-ref
  (volatile! nil))

(defn main [& args]
  (js/console.log "starting server")
  (let [server (http/createServer #(request-handler %1 %2))]

    (.listen server 3000
      (fn [err]
        (if err
          (js/console.error "server start failed")
          (js/console.info "http server running"))
        ))

    (vreset! server-ref server)))

(defn start
  "Hook to start. Also used as a hook for hot code reload."
  []
  (js/console.warn "start called")
  (main))

(defn stop
  "Hot code reload hook to shut down resources so hot code reload can work"
  [done]
  (js/console.warn "stop called")
  (when-some [srv @server-ref]
    (.close srv
      (fn [err]
        (js/console.log "stop completed" err)
        (done)))))

(js/console.log "__filename" js/__filename)
The associated configuration is (shadow-cljs.edn):
{...
 :builds
   { :script {... as before

              ; add in reload hooks
              :devtools {:before-load-async demo.script/stop
:after-load demo.script/start}}}}|
Warning
|
Many libraries hide state or do actions that prevent hot code reloading from working well. There is nothing the compiler can do to improve this since it has no idea what those libraries are doing. Hot code reload will only work well in situations where you can cleanly "stop" and "restart" the artifacts used. |
10.2. node.js Libraries
The :target :node-library emits code that can be used (via require) as a standard node library, and is
useful for publishing your code for re-use as a compiled Javascript artifact.
As with other modes the main configuration options apply and must be set. The target-specific options are:
:target
|
Use :node-library |
:output-to
|
(required). The path and filename for the generated library. |
:output-dir
|
(optional). The path for supporting files in development mode. Defaults to a cache directory. |
The hot code reload story is similar to the script target, but may not work as well since it cannot as easily control all of the code that is loaded.
Controlling what code is actually exported is done via one of the following options:
-
:exports- a map of keyword to fully qualified symbols -
:exports-var- a fully qualified symbol -
:exports-fn- a fully qualified symbol
10.2.1. Single static "default" export
:exports-var will just return whatever is declared under that var. It can point to a defn or normal def.
:exports-var{...
:builds {:lib {:output-to "lib.js"
:exports-var demo.ns/f
...}}}(ns demo.ns)
(defn f [...] ...)
;; OR
(def f #js {:foo ...})$ node
> var f = require('./lib.js');
f(); // the actual demo.ns/f functionIt is effectively generating module.exports = demo.ns.f;
10.2.2. Multiple static named exports
{...
 :builds {:lib {:exports {:g       demo.ns/f
                          :h       other.ns/thing
                          :ns/ok?  another.ns/ok?}
                ...}}}
The keyword is used as the name of the entry in the exported object. No munging is done to this keyword name
(but namespaces are dropped). So, the above example maps cljs f to g, etc.:
$ node
> var lib = require('./lib.js');
lib.g(); // call demo-ns/f
lib["ok?"](); // call another-ns/ok?
You can achieve the exact same thing by using :exports-var pointing to a def
(def exports #js {:g f
                  ...})
10.2.3. "Dynamic" exports
In addition you may specify :exports-fn as a fully qualified symbol. This should point to a function with no arguments which should return a JS object (or function). This function will only ever be called ONCE as node caches the return value.
(ns demo.ns
  (:require [demo.other :as other]))

(defn generate-exports []
  #js {:hello hello
:foo other/foo}){...
:builds {:lib {:exports-fn demo.ns/generate-exports
...}}}|
Note
|
The exports config automatically tracks exported symbols and passes them on to the optimization stage. This means that anything listed in :exports will not be renamed by Google Closure optimizations.
|
10.2.4. Full Example
The example below creates a lib.js file intended to be consumed via the normal Node require mechanism.
(ns demo.lib)

(defn hello []
  (prn "hello")
  "hello")
The build configuration would be:
{...
 :builds {:library {:target    :node-library
                    :output-to "out/demo-library/lib.js"
                    :exports   {:hello demo.lib/hello}}}}
and the runtime use is as you would expect:
$ cd out/demo-library
$ node
> var x = require('./lib');
undefined
> x.hello()
hello
'hello'
As :node-script this will only create the file specified in :output-to. The :exports map maps CLJS vars to the name they should be exported to.
11. Embedding in the JS Ecosystem — The :npm-module Target
There is an additional target that is intended to integrate CLJS into an existing JS project. The output can seamlessly integrate with existing JS tools (eg. webpack, browserify, babel, create-react-app, …) with little configuration.
:output-dir
|
(required) The path for the output files are written to |
:entries
|
(required) A vector of namespace symbols that should be compiled |
:ns-regexp
|
(optional) A regular expression matching namespaces against project files. This only scans files, and will not scan jars. |
shadow-cljs.edn config{...
:builds
{:code
{:target :npm-module
:output-dir "out"
:entries [demo.foo]}}}With a JS file sitting in your project root, you may require("./out/demo.foo") to load the CLJS namespace and access it from JS. The JS requires must be the relative path from the JS file location to the CLJS output.
If you plan to distribute code on NPM, then you may want to use the :node-library target instead since it allows for a finer level of control over exports and optimization.
11.1. Working with Optimizations
Unlike the :node-library target, the module target does not know what you want to call the
symbols you’re exporting, so it just exports them as-is. If you use advanced compilation, then everything
will get a minified munged name!
This is easy to remedy, simply add :export metadata on any symbols that you want to preserve:
(ns demo.foo)

(def ^:export foo 5.662)

(defn ^:export bar [] ...)
This is a standard annotation that is understood by ClojureScript and prevents Google Closure from
renaming an artifact. JS code will still be able to access them after optimizations. Without the ^:export hint the closure-compiler will likely have removed or renamed them.
var ns = require("shadow-cljs/demo.foo");

ns.foo;
ns.bar();
12. Testing
shadow-cljs provides a few utility targets to make building tests a little easier.
All test targets generate a test runner and automatically add all namespaces matching the configurable :ns-regexp. The default test runners were built for cljs.test but you can create custom runners if you prefer to use other test frameworks.
The default :ns-regexp is "-test$", so your first test could look like:
src/test/demo/app_test.cljs(ns demo.app-test
(:require [cljs.test :refer (deftest is)]))
(deftest a-failing-test
(is (= 1 2)))In the Clojure world it is common to keep test files in their own source paths so the above example assumes you have configured :source-paths ["src/main" "src/test"] in your shadow-cljs.edn config. Your usual app code goes into src/main and the tests go into src/test. This however is optional and it is totally fine to keep everything in src and just use :source-paths ["src"].
12.1. Testing in node.js
This target will create a test runner including all test namespaces matching the given regular expression.
The relevant configuration options are:
:target
|
|
:output-to
|
The final output file that will be used to run tests. |
:ns-regexp
|
(optional) A regular expression matching namespaces against project files. This only scans files, and will not scan jars. Defaults to |
:autorun
|
(boolean, optional) Run the tests via |
:main
|
(qualified symbol, optional) Function called on startup to run the tests, defaults to |
*-spec namespaces{...
:builds
{:test
{:target :node-test
:output-to "out/node-tests.js"
:ns-regexp "-spec$"
:autorun true}}}The :node-test target only generates the test file. You can run it via node.
$ shadow-cljs compile test
# or
$ shadow-cljs release test

# run tests manually, :autorun will do this automatically
$ node out/node-tests.js

# compile & test combined
$ shadow-cljs compile test && node out/node-tests.js
The node process exit code will be set to 0 when successful and 1 on any failures. (The node process exit code will not be returned when using :autorun.)
12.2. Testing in the Browser
This target is meant for gathering up namespaces that contain tests (based on a filename pattern match),
and triggering a test runner. It contains a built-in runner that will automatically scan for cljs.test
tests and run them.
The relevant configuration options are:
:target
|
|
:test-dir
|
A folder in which to output files. See below. |
:ns-regexp
|
(optional) A regular expression matching namespaces against project files. This only scans files, and will not scan jars. Defaults to "-test$". |
:runner-ns
|
(optional) A namespace that can contain a start, stop, and init function. Defaults to
|
The normal :devtools options are supported, so you will usually create an http server to serve the files.
In general you will need a config that looks like this:
{...
 ;; tests are served via http://localhost:8021
 :dev-http {8021 "out/test"}
 :builds
 {:test
  {:target :browser-test
   :test-dir  "out/test"}}}
If you choose to supply a custom :runner-ns, it might look like this:
(ns tests.client-test-main
  {:dev/always true}
  (:require [shadow.test :as st]
            [shadow.test.env :as env]
            [cljs-test-display.core :as ctd]
            [shadow.dom :as dom]))

(defn start []
  (-> (env/get-test-data)
      (env/reset-test-data!))

  (st/run-all-tests (ctd/init! "test-root")))

(defn stop [done]
  ; tests can be async. You must call done so that the runner knows you actually finished
  (done))

(defn ^:export init []
  (dom/append [:div#test-root])
  (start))
Then in the build config add :runner-ns tests.client-test-main.
It just has init, start, stop methods. init will be called once on startup, stop will be called before any code is reloaded and start will be called after all code was reloaded.
|
Tip
|
:runner-ns is optional, just leave it out to use the default.
|
12.2.1. Generated output in :test-dir
The output includes two primary artifacts in your test-dir folder:
-
index.html- If and only if there was not already anindex.htmlfile present. By default the generated file loads the tests and runsinitin the:runner-ns. You may edit or add a custom version that will not be overwritten. -
js/test.js- The Javascript tests. The tests will always have this name. The entries for the module are auto-generated.
Any webserver is fine, :dev-http is just a convenient option.
12.3. Targeting Tests to Karma for Continuous Integration
When you want to run your CLJS tests against a browser on some kind of CI server you’ll need to
be able to run the tests from a command line and get back a status code. Karma is a well-known
and supported test runner that can do this for you, and shadow-cljs includes a target that
can add the appropriate wrappers around your tests so they will work in it.
12.3.1. Installing Karma
See their website for full instructions. You’ll typically need
something like this in your package.json:
{
  "name": "CITests",
  "version": "1.0.0",
  "description": "Testing",
  ...
  "devDependencies": {
    "karma": "^2.0.0",
    "karma-chrome-launcher": "^2.2.0",
    "karma-cljs-test": "^0.1.0",
    ...
  },
  "author": "",
  "license": "MIT"
}
So, you need Karma, a browser launcher, and the cljs-test integration.
12.3.2. The Build
The build options are:
:target
|
|
:output-to
|
A path/filename for the js file. |
:ns-regexp
|
(optional) A regex to match the test namespaces, defaults to "-test$ |
So you might have something like this:
{...
 :builds
 {:ci
  {:target :karma
   :output-to  "target/ci.js"
   :ns-regexp  "-spec$"}}}
You also need a karma.conf.js:
module.exports = function (config) {
    config.set({
        browsers: ['ChromeHeadless'],
        // The directory where the output file lives
        basePath: 'target',
        // The file itself
        files: ['ci.js'],
        frameworks: ['cljs-test'],
        plugins: ['karma-cljs-test', 'karma-chrome-launcher'],
        colors: true,
        logLevel: config.LOG_INFO,
        client: {
            args: ["shadow.test.karma.init"],
            singleRun: true
        }
    })
};
then you can run the tests as follows (assuming you’ve installed global executables of the tools):
$ shadow-cljs compile ci
$ karma start --single-run
12 01 2018 01:19:24.222:INFO [karma]: Karma v2.0.0 server started at http://0.0.0.0:9876/
12 01 2018 01:19:24.224:INFO [launcher]: Launching browser ChromeHeadless with unlimited concurrency
12 01 2018 01:19:24.231:INFO [launcher]: Starting browser ChromeHeadless
12 01 2018 01:19:24.478:INFO [HeadlessChrome 0.0.0 (Mac OS X 10.12.6)]: Connected on socket TcfrjxVKmx7xN6enAAAA with id 85554456
LOG: 'Testing boo.sample-spec'
HeadlessChrome 0.0.0 (Mac OS X 10.12.6): Executed 1 of 1 SUCCESS (0.007 secs / 0.002 secs)
13. JavaScript Integration
13.1. NPM
npm has become the de-facto standard package manager for JavaScript. Almost all JS libraries can be found there and shadow-cljs provides seamless integration for accessing those packages.
13.1.1. Using npm packages
Most npm packages will also include some instructions on how to use the actual code. The “old” CommonJS style just has require calls which translate directly:
var react = require("react");(ns my.app
(:require ["react" :as react]))Whatever "string" parameter is used when calling require we transfer to the :require as-is. The :as alias is up to you. Once we have that we can use the code like any other CLJS namespace!
(react/createElement "div" nil "hello world")In shadow-cljs: always use the ns form and whatever :as alias you provided. You may also use :refer and :rename. This is different than what :foreign-libs/CLJSJS does where you include the thing in the namespace but then used a global js/Thing in your code.
Some packages just export a single function which you can call directly by
using (:require ["thing" :as thing]) and then (thing).
More recently some packages started using ES6 import statements in their examples. Those also translate pretty much 1:1 with one slight difference related to default exports.
The following examples can be used for translation:
|
Important
|
This table only applies if the code you are consuming is packaged as actual ES6+ code. If the code is packaged as CommonJS instead the $default may not apply. See the section below for more info.
|
|
Important
|
The names defaultExport or export here are chosen to show what they represent. In case of defaultExport, or any other :as alias, you can substitute it with any name you like. In case of :refer you must use the name chosen by the library or use :rename to change it. The important new thing is the introduction of Default Exports and what they mean in terms of requiring them.
|
import defaultExport from "module-name";(:require ["module-name$default" :as defaultExport])import * as name from "module-name";(:require ["module-name" :as name])import { export } from "module-name";(:require ["module-name" :refer (export)])import { export1 , export2 } from "module-name";(:require ["module-name" :refer (export1 export2)])import { export as alias } from "module-name";(:require ["module-name" :rename {export alias}])import { export1 , export2 as alias2 } from "module-name";(:require ["module-name" :refer (export1) :rename {export2 alias2}])import defaultExport, { export } from "module-name";(:require
["module-name" :refer (export)]
["module-name$default" :as defaultExport])import defaultExport, * as name from "module-name";(:require
["module-name" :as name]
["module-name$default" :as defaultExport])import from "module-name";(:require ["module-name"])Notice that previously we were stuck using bundled code which included a lot of code we didn’t actually need. Now we’re in a better situation: Some libraries are also packaged in ways that allow you to include only the parts you need, leading to much less code in your final build.
react-virtualized is a great example:
// You can import any component you want as a named export from 'react-virtualized', eg
import { Column, Table } from 'react-virtualized'

// But if you only use a few react-virtualized components,
// And you're concerned about increasing your application's bundle size,
// You can directly import only the components you need, like so:
import AutoSizer from 'react-virtualized/dist/commonjs/AutoSizer'
import List from 'react-virtualized/dist/commonjs/List'
With our improved support we we can easily translate this to:
(ns my-ns
  ;; all
  (:require ["react-virtualized" :refer (Column Table)])
  ;; OR one by one
  (:require ["react-virtualized/dist/commonjs/AutoSizer$default" :as virtual-auto-sizer]
            ["react-virtualized/dist/commonjs/List$default" :as virtual-list]))
If a :require does not seem to work properly it is recommended to try looking at it in the REPL.
$ shadow-cljs browser-repl (or node-repl)
...
[1:1]~cljs.user=> (require '["react-tooltip" :as x])
nil
[1:1]~cljs.user=> x
#object[e]
[1:1]~cljs.user=> (goog/typeOf x)
"function"
[1:1]~cljs.user=> (js/console.dir x)
nil
Since printing arbitrary JS objects is not always useful (as seen above) you can use (js/console.dir x) instead to get a more useful representation in the browser console. goog/typeOf may also be useful at times.
13.1.2. Package Provider
shadow-cljs supports several different ways to include npm packages into your build. They are configurable via the :js-options :js-provider setting. Each :target usually sets the one appropriate for your build most often you won’t need to touch this setting.
Currently there are 3 supported JS Providers:
:require-
Maps directly to the JS
require("thing")function call. It is the default for allnode.jstargets since it can resolverequirenatively at runtime. The included JS is not processed in any way. :shadow-
Resolves the JS via
node_modulesand includes a minified version of each referenced file in the build. It is the default for the:browsertarget.node_modulessources do not go through:advancedcompilation. :closure-
Resolves similarly to
:shadowbut attempts to process all included files via the Closure Compiler CommonJS/ES6 rewrite facilities. They will also be processed via:advancedcompilation. :external-
Only collects JS requires and emits an index file (configured via
:external-index "foo/bar.js") that is meant to be processed by any other JS build tool and will actually provide the JS dependencies. The emitted index file contains a bit of glue code so that the CLJS output can access the JS dependencies. The output of the external index file should be loaded before the CLJS output.
:closure in a :browser build.{...
:builds
{:app
{:target :browser
...
:js-options {:js-provider :closure}
}}}13.1.3. CommonJS vs ESM
Nowadays many npm packages ship multiple build variants. shadow-cljs will by default pick the variant linked under the main or browser key in package.json. This most commonly refers to CommonJS code. Some modern packages also provide a module entry which usually refers to ECMAScript code (meaning "modern" JS). Interop between CommonJS and ESM can be tricky so shadow-cljs defaults to using CommonJS but it can be beneficial to use ESM.
It is largely dependent on the packages you use whether this will work or not. You can configure shadow-cljs to prefer the module entry via the :entry-keys JS option. It takes a vector of string keys found in package.json which will be tried in order. The default is "["browser" "main" "module"].
{...
 :builds
 {:app
  {:target :browser
   ...
   :js-options {:entry-keys ["module" "browser" "main"]} ;; try "module" first
   }}}
Make sure to test thoroughly and compare the build report output to check size differences when switching this. Results may vary greatly in positive or negative ways.
13.1.4. Resolving Packages
By default shadow-cljs will resolve all (:require ["thing" :as x]) requires following the npm convention. This means it will look at <project>/node_modules/thing/package.json and follow the code from there. To customize how this works shadow-cljs exposes a :resolve config option that lets you override how things are resolved.
Using a CDN
Say you already have React included in your page via a CDN. You could just start using js/React again but we stopped doing that for a good reason. Instead you can continue to use (:require ["react" :as react]) but configure how "react" resolves!
Here is a sample shadow-cljs.edn config for such a build:
{...
 :builds
 {:app
  {:target :browser
   ...
   :js-options
   {:resolve {"react" {:target :global
                       :global "React"}}}}

  :server
  {:target :node-script
   ...}}}
The :app build will now use the global React instance while the :server build continues using the "react" npm package! No need to fiddle with the code to make this work.
Redirecting “require”
Sometimes you want more control over which npm package is actually used depending on your build. You can "redirect" certain requires from your build config without changing the code. This is often useful if you either don’t have access to the sources using such packages or you just want to change it for one build.
{...
 :builds
 {:app
  {:target :browser
   ...
   :js-options
   {:resolve {"react" {:target :npm
                       :require "preact-compat"}}}
You can also use a file to override the dependency, the path is relative to the project root.
{...
 :builds
 {:app
  {:target :browser
   ...
   :js-options
   {:resolve {"react" {:target :file
                       :file   "src/main/override-react.js"}}}
Limitations
The :shadow-js and :closure have full control over :resolve and everything mentioned above works without any downsides. The :js-provider :require however is more limited. Only the initial require can be influenced since the standard require is in control after that. This means it is not possible to influence what a package might require internally. It is therefore not recommended to be used with targets that use require directly (eg. :node-script).
{...
 :builds
 {:app
  {:target :node-script
   ...
   :js-options
   {:resolve {"react" {:target :npm
:require "preact-compat"}}}(ns my.app
(:require
["react-table" :as rt]))The above works fine in the Browser since every "react" require will be replaced, including the "react" require "react-table" has internally. For :js-provider :require however a require("react-table") will be emitted and node will be in control how that is resolved. Meaning that it will resolve it to the standard "react" and not the "preact" we had configured.
13.1.5. Alternate Modules Directories
By default shadow-cljs will only look at the <project-dir>/node_modules directory when resolving JS packages. This can be configured via the :js-package-dirs option in :js-options. This can be applied globally or per build.
Relative paths will be resolved relative to the project root directory. Paths will be tried from left to right and the first matching package will be used.
shadow-cljs.edn{...
:js-options {:js-package-dirs ["node_modules" "../node_modules"]}
...}{...
:builds
{:app
{...
:js-options {:js-package-dirs ["node_modules" "../node_modules"]}}}}13.2. Dealing with .js Files
We covered how npm packages are used but you may be working on a codebase that already has lots of plain JavaScript and you don’t want to rewrite everything in ClojureScript just yet. shadow-cljs provides 100% full interop between JavaScript and ClojureScript. Which means your JS can use your CLJS and CLJS can use your JS.
There are only a few conventions you need to follow in order for this to work reliably but chances are that you are already doing that anyways.
13.2.1. Requiring JS
We already covered how npm packages are accessed by their name but on the classpath we access .js files by either a full path or relative to the current namespace.
(ns demo.app
  (:require
    ["/some-library/components/foo" :as foo]
["./bar" :as bar :refer (myComponent)]))|
Tip
|
For string requires the extension .js will be added automatically but you can specify the extension if you prefer. Note that currently only .js is supported though.
|
Absolute requires like /some-library/components/foo mean that the compiler will look for a some-library/components/foo.js on the classpath; unlike node which would attempt to load the file from the local filesystem. The same classpath rules apply so the file may either be in your :source-paths or in some third-party .jar library you are using.
Relative requires are resolved by first looking at the current namespace and then resolving a relative path from that name. In the above example we are in demo/app.cljs to the ./bar require resolves to demo/bar.js, so it is identical to (:require ["/demo/bar"]).
|
Important
|
The files must not be physically located in the same directory. The lookup for the file appears on the classpath instead. This is unlike node which expects relative requires to always resolve to physical files. |
.
├── package.json
├── shadow-cljs.edn
└── src
    └── main
        └── demo
            └── app.cljs
    └── js
        └── demo
            └── bar.js
13.2.2. Language Support
|
Important
|
It is expected that the classpath only contains JavaScript that can be consumed without any pre-processing by the Compiler. npm has a very similar convention.
|
The Closure Compiler is used for processing all JavaScript found on the classpath using its ECMASCRIPT_NEXT language setting. What exactly this setting means is not well documented but it mostly represents the next generation JavaScript code which might not even be supported by most browsers yet. ES6 is very well supported as well as most ES8 features. Similarly to standard CLJS this will be compiled down to ES5 with polyfills when required.
Since the Closure Compiler is getting constant updates newer features will be available over time. Just don’t expect to use the latest cutting edge preview features to be available immediately. Somewhat recent additions like async/await already work quite well.
The JS should be written using ES Module Syntax using import and export. JS files can include other JS files and reference CLJS code directly. They may also access npm packages directly with one caveat.
// regular JS require
import Foo, { something } from "./other.js";

// npm require
import React from "react";

// require CLJS or Closure Library JS
import cljs from "goog:cljs.core";

export function inc(num) {
  return cljs.inc(1);
}|
Important
|
Due to strict checking of the Closure Compiler it is not possible to use the import * as X from "npm"; syntax when requiring CLJS or npm code. It is fine to use when requiring other JS files.
|
13.2.3. JavaScript Dialects
Since there are many popular JavaScript dialects (JSX, CoffeeScript, etc) that are not directly parsable by the Closure Compiler we need to pre-process them before putting them onto the classpath. babel is commonly used in the JavaScript world so we are going to use babel to process .jsx files as an example here.
{:source-paths
 ["src/main"
  "src/gen"]
...}.
├── package.json
├── shadow-cljs.edn
└── src
└── main
└── demo
└── app.cljs
└── js
├── .babelrc
└── demo
└── bar.jsx|
Important
|
Notice how src/js is not added to :source-paths which means it will not be on the classpath.
|
import React from "react";

function myComponent() {
  return <h1>JSX!</h1>;
}

export { myComponent };
We run babel to convert the files and write them to the configured src/gen directory. Which directory you use is up to you. I prefer src/gen for generated files.
$ babel src/js --out-dir src/gen
# or during development
$ babel src/js --out-dir src/gen --watch
babel itself is configured via the src/js/.babelrc. See the official example for JSX and more about configuration files.
{
  "plugins": ["@babel/plugin-transform-react-jsx"]
}
Once babel writes the src/gen/demo/bar.js it will be available to use via ClojureScript and will even be hot loaded just like your ClojureScript sources.
|
Important
|
shadow-cljs currently does not provide any support for running those transformation steps. Please use the standard tools (eg. babel, coffeescript, etc.) directly until it does.
|
13.2.4. Access CLJS from JS
The JS sources can access all your ClojureScript (and the Closure Library) directly by importing their namespaces with a goog: prefix which the Compiler will rewrite to expose the namespace as the default ES6 export.
import cljs, { keyword } from "goog:cljs.core";

// construct {:foo "hello world"} in JS
cljs.array_map(keyword("foo"), "hello world");|
Tip
|
The goog: prefix currently only works for ES6 file. require("goog:cljs.core") does not work.
|
13.3. Migrating cljsjs.*
CLJSJS is an effort to package Javascript libraries to be able to use them from within ClojureScript.
Since shadow-cljs can access npm packages directly we do not need to rely on re-packaged CLJSJS packages.
However many CLJS libraries are still using CLJSJS packages and they would break with shadow-cljs since it doesn’t support those anymore. It is however very easy to mimick those cljsjs namespaces since they are mostly build from npm packages anyways. It just requires one shim file that maps the cljsjs.thing back to its original npm package and exposes the expected global variable.
For React this requires a file like src/cljsjs/react.cljs:
(ns cljsjs.react
  (:require ["react" :as react]
            ["create-react-class" :as crc]))
(js/goog.object.set react "createClass" crc)
(js/goog.exportSymbol "React" react)Since this would be tedious for everyone to do manually I created the shadow-cljsjs
library which provides just that. It does not include every package but I’ll keep adding
them and contributions are very welcome as well.
|
Note
|
The shadow-cljsjs library only provides the shim files. You’ll still need to
npm install the actual packages yourself.
|
13.3.1. Why not use CLJSJS?
CLJSJS packages basically just take the package from npm and put them into a .jar and re-publish them via clojars. As a bonus they often bundle Externs. The compiler otherwise does nothing with these files and only prepends them to the generated output.
This was very useful when we had no access to npm directly but has certain issues since not all packages are easily combined with others. A package might rely on react but instead of expressing this via npm they bundle their own react. If you are not careful you could end up including 2 different react versions in your build which may lead to very confusing errors or at the very least increase the build size substantially.
Apart from that not every npm package is available via CLJSJS and keeping the package versions in sync requires manual work, which means packages are often out of date.
shadow-cljs does not support CLJSJS at all to avoid conflicts in your code. One library might attempt to use the "old" cljsjs.react while another uses the newer (:require ["react"]) directly. This would again lead to 2 versions of react on your page again.
So the only thing we are missing are the bundled Externs. In many instances these are not required due to improved externs inference. Often those Externs are generated using third-party tools which means they are not totally accurate anyways.
Conclusion: Use npm directly. Use :infer-externs auto.
14. Generating Production Code — All Targets
Development mode always outputs individual files for each namespace so that they can be hot loaded in isolation. When you’re ready to deploy code to a real server you want to run the Closure Compiler on it to generate a single minified result for each module.
By default the release mode output file should just be a drop-in replacements for the development mode file: there is no difference in the way you include them in your HTML. You may use filename hashing to improve caching characteristics on browser targets.
$ shadow-cljs release build-id14.1. Release Configuration
Usually you won’t need to add any extra configuration to create a release version for your build. The default config already captures everything necessary and should only require extra configuration if you want to override the defaults.
Each :target already provides good defaults optimized for each platform so you’ll have less to worry about.
14.1.1. Optimizations
You can choose the optimization level using the :compiler-options section of the configuration:
|
Important
|
You do not usually need to set :optimizations since the :target already sets it to an appropriate level.
|
|
Important
|
:optimizations only apply when using the release command. Development builds are never optimized by the Closure Compiler. Development builds are always set to :none.
|
{...
 :build
   {:build-id
     {...
      :compiler-options {:optimizations :simple}}}}
See the the Closure compiler’s documentation for more information on available optimization levels.
14.1.2. Release-Specific vs. Development Configuration
If you wish to have separate configuration values in a build when running a release build then you
can override settings by including a :dev and/or :release section in the build section:
shadow-cljs.edn build config{:source-paths ["src"]
:dependencies []
:builds
{:app
{:target :browser
:output-dir "public/js"
:asset-path "/js"
:modules {:base {:entries [my.app.core]}}
;; Here is some dev-specific config
:dev {:compiler-options {:devcards true}}
;; Here is some production config
:release {:compiler-options {:optimizations :simple}}}}}14.2. Externs
Since we want builds to be fully optimized by the Closure Compiler :advanced compilation we need to deal with Externs. Externs represent pieces of code that are not included when doing :advanced compilation. :advanced works by doing whole program optimizations but some code we just won’t be able to include so Externs inform the Compiler about this code. Without Externs the Compiler may rename or remove some code that it shouldn’t.
Typically all JS Dependencies are foreign and won’t be passed through :advanced and thus require Externs.
|
Tip
|
Externs are only required for :advanced, they are not required in :simple mode.
|
14.2.1. Externs Inference
To help deal with Externs the shadow-cljs compiler provides enhanced externs inference, which is enabled by default. The compiler will perform additional checks at compile time for your files only. It won’t warn you about possible externs issues in library code.
You’ll get warnings whenever the Compiler cannot figure out whether you are working with JS or CLJS code. If you don’t get any warnings you should be OK.
(defn wrap-baz [x]
(.baz x))------ WARNING #1 --------------------------------------------------------------
File: ~/project/src/demo/thing.cljs:23:3
--------------------------------------------------------------------------------
21 |
22 | (defn wrap-baz [x]
23 | (.baz x))
---------^----------------------------------------------------------------------
Cannot infer target type in expression (. x baz)
--------------------------------------------------------------------------------In :advanced the compiler might be renaming .baz to something "shorter" and Externs inform the Compiler that this is an external property that should not be renamed.
The warning tells you that the compiler did not recognize the property baz in the x binding. shadow-cljs can generate the appropriate externs if you add a typehint to the object you are performing native interop on.
(defn wrap-baz [x]
  (.baz ^js x))
The ^js typehint will cause the compiler to generate proper externs and the warning will go away. The property is now safe from renaming. You may either directly tag the interop form, or you may tag the variable name where it is first bound.
(defn wrap-baz [x]
  (.foo ^js x)
  (.baz ^js x))
It can get tedious to annotate every single interop call, so you can annotate the variable binding itself. It will be used in the entire scope for this variable. Externs for both calls will still be generated. So, instead you do:
x directly(defn wrap-baz [^js x]
(.foo x)
(.baz x))|
Important
|
Don’t annotate everything with ^js. Sometimes you may be doing interop on CLJS or ClosureJS objects. Those do not require externs. If you are certain you are working with a CLJS object use the ^clj hint instead.
It is not the end of the world to use ^js incorrectly, but it may affect some optimizations when a variable is not renamed when it could be.
|
Calling a global using js/ does not require a typehint.
(js/Some.Thing.coolFunction)Calls on :require bindings are also inferred automatically.
:as and :refer bindings(ns my.app
(:require ["react" :as react :refer (createElement)]))
(react/createElement "div" nil "hello world")
(createElement "div" nil "hello world")14.2.2. Manual Externs
Some libraries provide Externs as separate .js files. You can include them into your build via the :externs compiler options.
{...
 :builds
 {:app
  {:target :browser
   ...
   :compiler-options {:externs ["path/to/externs.js" ...]}
}}}|
Tip
|
The compiler looks for files relative to the project root first. It will also attempt to load them from the classpath if no file is found. |
14.2.3. Simplified Externs
Writing Externs by hand can be challenging and shadow-cljs provides a way to write a more convenient way to write them. Start by creating a externs/<your-build>.txt, so build :app would be externs/app.txt. In that file each line should be one word specifying a JS property that should not be renamed. Global variables should be prefixed by global:
# this is a comment
foo
bar
global:SomeGlobalVariable
In this example the compiler will stop renaming something.foo(), something.bar().
14.3. Build Report
shadow-cljs can generate a detailed report for your release builds which includes a detailed breakdown of the included sources and how much they each contributed to the overall size.
A sample report can be found here.
The report can either be generated by running a separate command or by configuring a build hook for your build.
$ npx shadow-cljs run shadow.cljs.build-report <build-id> <path/to/output.html>
# example
$ npx shadow-cljs run shadow.cljs.build-report app report.html
The above example will generate a report.html in the project directory for the :app build.
|
Tip
|
The generated HTML file is entirely self-contained and includes all the required data/js/css. No other external sources are required. |
{...
 :builds
 {:app
  {:target :browser
   :output-dir "public/js"
   :modules ...
   :build-hooks
   [(shadow.cljs.build-report/hook)]
   }}}
This will generate a report.html in the configured public/js output directory for every release build automatically. This can be configured where this is written to by supplying an extra :output-to option. This path is then treated as relative to the project directory, not the :output-dir.
{...
 :builds
 {:app
  {:target :browser
   :output-dir "public/js"
   :modules ...
   :build-hooks
   [(shadow.cljs.build-report/hook
      {:output-to "tmp/report.html"})]
   }}}
Only release builds will produce a report when using the hook, it does not affect watch or compile.
|
Important
|
The build report is generated by parsing the source maps, so the hook will automatically force the generation of source maps. The files won’t be linked from the .js files directly, unless you actually enabled them via :compiler-options {:source-map true} yourself.
|
The dedicated build report command runs separately from watches you may have running. You do not need to stop any of them nor do you need to stop the shadow-cljs server before building the report.
15. Editor Integration
15.1. Cursive
Cursive does not currently support resolving dependencies via shadow-cljs.edn. You can run shadow-cljs pom to generate a pom.xml and import that using the IntelliJ.
$ shadow-cljs pomThen in Cursive File → New → Project from Existing Sources then select the generated pom.xml in the project directory.
|
Important
|
You need to have the "Build Tools" → "Maven" Plugin enabled for this. It might not be enabled by default. |
Alternatively you can create a dummy project.clj or use the full Leiningen integration.
(defproject your/project "0.0.0"
  :dependencies
  [[thheller/shadow-cljs "X.Y.Z"]]

  :source-paths
  ["src"])
You can run npx shadow-cljs server inside the Terminal provided by IntelliJ and use Clojure REPL → Remote Run Configuration to connect to the provided nREPL server. Just select the "Use port from nREPL file" option in Cursive Clojure REPL → Remote or configure a fixed nREPL port if you prefer.
Note that the Cursive REPL when first connected always starts out as a CLJ REPL. You can switch it to CLJS by calling (shadow/repl :your-build-id). This will automatically switch the Cursive option as well. You can type :cljs/quit to drop back down to the CLJ REPL.
|
Note
|
You cannot switch from CLJ→CLJS via the Cursive select box. Make sure you use the call above to switch. |
15.2. Emacs / CIDER
This section is written for CIDER version 0.20.0 and above. Ensure your Emacs environment has this version of the cider package or later. Refer to the CIDER documentation for full installation details.
15.2.1. Launch the ClojureScript REPL
Launch the nREPL and a ClojureScript REPL.
M-x cider-jack-in-cljsCIDER will prompt you for the type of ClojureScript REPL:
Select ClojureScript REPL type:Enter shadow.
Select shadow-cljs build:Enter the name of your build target, for example, app.
Emacs should now open a new nREPL connection to the shadow-cljs server of its sibling, bootstrapping into a ClojureScript REPL environment:
shadow.user> To quit, type: :cljs/quit
[:selected :app]
cljs.repl>
You should now be able to eval ClojureScript, jump to the definitions of vars (with cider-find-var) and much more.
For example, to display an alert in the browser:
cljs.repl> (js/alert "Jurassic Park!")15.2.2. Simplify startup with dir-local
You can simplify startup flow by a creating a .dir-locals.el file at project root.
((nil . ((cider-default-cljs-repl . shadow)
         (cider-shadow-default-options . "<your-build-name-here>"))))
Or, when watching several builds:
((nil . ((cider-default-cljs-repl . shadow)
         (cider-shadow-default-options . "<your-build-name-here>")
         (cider-shadow-watched-builds . ("<first-build>" "<other-build>")))))
Read about Emacs and shadow-cljs, using the .dir-locals.el file at the Cider docs
15.2.3. Using deps.edn with custom repl intialization.
In case you want to manage your dependencies via deps.edn, you can use
custom cljs-repl init form. Create a :dev alias with an extra source path of "dev" and add the following
namespace
(ns user
  (:require [shadow.cljs.devtools.api :as shadow]
            [shadow.cljs.devtools.server :as server]))

(defn cljs-repl
  "Connects to a given build-id. Defaults to `:app`."
  ([]
   (cljs-repl :app))
  ([build-id]
   (server/start!)
   (shadow/watch build-id)
   (shadow/nrepl-select build-id)))
Supposing your build-id is :app, add the following to your .dir-locals.el
((nil . ((cider-clojure-cli-global-options . "-A:dev")
         (cider-preferred-build-tool       . clojure-cli)
         (cider-default-cljs-repl          . custom)
         (cider-custom-cljs-repl-init-form . "(do (user/cljs-repl))")
         (eval . (progn
                   (make-variable-buffer-local 'cider-jack-in-nrepl-middlewares)
                   (add-to-list 'cider-jack-in-nrepl-middlewares "shadow.cljs.devtools.server.nrepl/middleware"))))))
cider-jack-in-cljs should then work out of the box.
15.3. Proto REPL (Atom)
Proto REPL is mostly intended for Clojure development so most features do not work for ClojureScript. It is however possible to use it for simple evals.
You need to setup a couple of things to get it working.
1) Create a user.clj in on of your :source-paths.
 (ns user)

 (defn reset [])
The file must define the user/reset fn since Proto REPL will call that when connecting. If user/reset is not found it will call tools.namespace which destroys the running shadow-cljs server. We don’t want that. You could do something here but we don’t need to do anything for CLJS.
2) add [proto-repl "0.3.1"] to your :dependencies in ~/.shadow-cljs/config.edn or shadow-cljs.edn.
3) Configure a fixed nREPL port
4) Start shadow-cljs server or shadow-cljs watch your-build.
5) Run the Atom Command Proto Repl: Remote Nrepl Connection connect to localhost and the port you configured
6) Eval (shadow.cljs.devtools.api/watch :your-build) (if you used server in 4)
7) Eval (shadow.cljs.devtools.api/nrepl-select :your-build). The REPL connection is now in CLJS mode, meaning that everything you eval will be eval’d in JS. You can eval :repl/quit to get back to Clojure Mode. If you get [:no-worker :browser] you need to start the watch first.
8) Before you can eval CLJS you need to connect your client (eg. your Browser when building a :browser App).
9) Eval some JS, eg. (js/alert "foo"). If you get There is no connected JS runtime the client is not connected properly. Otherwise the Browser should show an alert.
15.4. Chlorine (Atom)
Chlorine connects Atom to a Socket REPL, but also tries to refresh namespace. So first, open up Chlorine package config and check if configuration Should we use clojure.tools.namespace to refresh is set to simple, otherwise it’ll destroy the running shadow-cljs server.
Once you checked that the configuration is right, you can start your shadow app (replace app with whatever build):
$ shadow-cljs watch appNow, all you have to do is to run the atom command Chlorine: Connect Clojure Socket Repl. This will connect a REPL to evaluate Clojure code. Next you need to run Chlorine: Connect Embeded, and it’ll connect the ClojureScript REPL too.
Now, you can use the Chlorine: Evaluate… commands to evaluate any Clojure or ClojureScript REPL. It’ll evaluate .clj files as Clojure, and cljc files as ClojureScript.
15.5. Calva (VS Code)
Calva has built-in support for shadow-cljs.
15.5.1. Dependencies
You need VS Code and the Calva extension.
15.5.2. Start the REPL
The easiest way to start the REPL is to use Calva’s Jack-in command and then select the shadow-cljs Project Type. This will start the shadow-cljs watcher and inject the necessary cider-nrepl dependencies.
If you want to start the REPL yourself you can:
-
Use the Calva command Copy Jack-in Command to Clipboard
-
Start the REPL from the terminal (VS Code’s built-in terminal works great for this)
-
Use the Calva command Connect to a Running REPL
15.5.3. Connecting Calva to the build
Once shadow is done with its initial compile, start the app (in the browser, or node, or whatever, depending on your app).
Calva will prompt you for witch build to attach the REPL connection to. Calva has a command (and a statusbar button) for switching witch build is attached.
Hack away!
See calva.io for information about how to use Calva.
15.6. Fireplace.vim (Vim/Neovim)
Fireplace.vim is a Vim/Neovim plug-in which provides Clojure REPL integration by acting as an nREPL client. When combined with Shadow-CLJS, it also provides ClojureScript REPL integration.
This guide uses as an example the app created in the official Shadow-CLJS Quick Start guide therefore refers to a few configuration items in the app’s shadow-cljs.edn. That being said, these configuration items are fairly generic so should be applicable to other apps with minor modifications.
15.6.1. Dependencies
Install Fireplace.vim using your favorite method of installing plug-ins in Vim/Neovim.
As an nREPL client, Fireplace.vim depends on CIDER-nREPL (which is nREPL middleware that provides common, editor-agnostic REPL operations) therefore you need to include this dependency in ~/.shadow-cljs/config.edn or shadow-cljs.edn (as shown in the next sub-section.) Shadow-CLJS will inject the required CIDER-nREPL middleware once it sees this dependency.
15.6.2. Preparing the app
Create the example app by following the official Shadow-CLJS Quick Start guide and modify its shadow-cljs.edn as follows:
;; shadow-cljs configuration
{:source-paths
 ["src/dev"
  "src/main"
  "src/test"]

 ;; ADD - CIDER-nREPL middleware required by Fireplace.vim
 :dependencies
 [[cider/cider-nrepl "0.22.4"]]

 ;; ADD - a port (e.g., 3333) for the REPL server to which Fireplace.vim connects
 :nrepl
 {:port 3333}

 ;; ADD - a port (e.g., 8080) for the development-time HTTP server that serves the app
 :dev-http
 {8080 "public"}

 :builds
 {:frontend  ; NOTE - This is the build ID referenced at various places below.
  {:target :browser
   :modules {:main {:init-fn acme.frontend.app/init}}}}}
Once that is done, start the app (note the Shadow-CLJS build ID, frontend, specified in shadow-cljs.edn):
npx shadow-cljs watch frontendOpen the app in a browser at http://localhost:8080/. Without this step, you would get the following error message from Fireplace.vim if you attempt to connect to the REPL server from within Vim/Neovim:
No application has connected to the REPL server.
Make sure your JS environment has loaded your compiled ClojureScript code.
15.6.3. Connecting Fireplace.vim to REPL Server
Open a ClojureScript source file in Vim/Neovim and execute the following command to connect Fireplace.vim to the REPL server (note the port for the REPL server, 3333, specified in shadow-cljs.edn):
:Connect 3333
=>
Connected to nrepl://localhost:3333/
Scope connection to: ~/code/clojurescript/acme-app (ENTER)
This creates a Clojure (instead of ClojureScript) REPL session. Execute the following command to add ClojureScript support to the session (note the Shadow-CLJS build ID, frontend, specified in shadow-cljs.edn):
:CljEval (shadow/repl :frontend)
=>
To quit, type: :cljs/quit
[:selected :frontend]
Press ENTER or type command to continueYou should now be able to execute Fireplace.vim commands against the REPL server. Please refer to the Fireplace.vim documentation for the full list of commands you can execute.
16. Troubleshooting
16.1. Startup Errors
Sometimes shadow-cljs can fail to start properly. The errors are often very confusing and hard to identify. Most commonly this is caused by a few dependency conflicts on some of the important dependencies. When using just shadow-cljs.edn to manage your :dependencies it will provide a few extra checks to protect against these kinds of errors but when using deps.edn or project.clj these protections cannot be done so these errors happen more often when using those tools.
Generally the important dependencies to watch out for are
-
org.clojure/clojure
-
org.clojure/clojurescript
-
org.clojure/core.async
-
com.google.javascript/closure-compiler-unshaded
Each shadow-cljs version is only tested with one particular combination of versions and it is recommended to stick with that version set for best compatibility. It might work when using different versions but if you encounter any kind of weird issues consider fixing your dependency versions first.
You can find the required dependencies for each version on clojars:
The way to diagnose these issues vary by tool, so please refer to the appropriate section for further info.
Generally if you want to be sure you can just declare the matching dependency versions directly together with your chosen shadow-cljs version but that means you must also update those versions whenever you upgrade shadow-cljs. Correctly identifying where unwanted dependencies may be more work but will make future upgrades easier.
shadow-cljs will likely always be on the very latest version for all the listed dependencies above so if you need to stick with an older dependency you might need to stick with an older shadow-cljs version as well.
shadow-cljs is very often several versions ahead on the com.google.javascript/closure-compiler-unshaded version it uses, so if you are depending on the version org.clojure/clojurescript normally supplies that might cause issues. Make sure the thheller/shadow-cljs version is picked over the version preferred by org.clojure/clojurescript.
If you want to make your life easier just use shadow-cljs.edn to manage your dependencies if you can. It is much less likely to have these problems or will at least warn you directly.
If you have ensured that you are getting all the correct versions but things still go wrong please open a Github Issue with a full problem description including your full dependency list.
16.1.1. deps.edn / tools.deps
When using deps.edn to manage your dependencies via the :deps key in shadow-cljs.edn it is recommended to use the clj tool directly for further diagnosis. First you need to check which aliases you are applying via shadow-cljs.edn. So if you are setting :deps {:aliases [:dev :cljs]} you’ll need to specify these aliases when running further commands.
First of all you should ensure that all dependencies directly declared in deps.edn have the expected version. Sometimes transitive dependencies can cause the inclusion of problematic versions. You can list all dependencies via:
$ clj -A:dev:cljs -StreeThis will list all the dependencies. Tracking this down is a bit manual but you’ll need to verify that you get the correct versions for the dependencies mentioned above.
Please refer to the official tools.deps documentation for further information.
16.1.2. project.clj / Leiningen
When using project.clj to manage you dependencies you’ll need to specify your configured :lein profiles from shadow-cljs.edn when using lein directly to diagnose the problem. For example :lein {:profile "+cljs"} would require lein with-profile +cljs for every command.
# no profile
$ lein deps :tree
# with profile
$ lein with-profile +cljs deps :treeThis will usually list all the current conflicts at the top and provide suggestions with the dependency tree at the bottom. The suggestions aren’t always fully accurate so don’t get mislead and don’t add exclusions to the thheller/shadow-cljs artifact.
Please refer to the Leiningen documentation for more information.
16.2. REPL
Getting a CLJS REPL working can sometimes be tricky and a lot can go wrong since all the moving parts can be quite complicated. This guide hopes to address the most common issues that people run into and how to fix them.
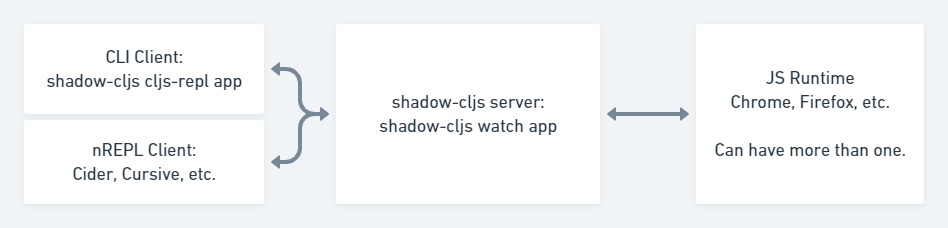
16.2.1. Anatomy of the CLJS REPL
A REPL in Clojure does exactly what the name implies: Read one form, Eval it, Print the result, Loop to do it again.
In ClojureScript however things are a bit more complicated since compilation happens on the JVM but the results are eval’d in a JavaScript runtime. There are a couple more steps that need to be done due in order to "emulate" the plain REPL experience. Although things are implemented a bit differently in shadow-cljs over regular CLJS the basic principles remain the same.
First you’ll need a REPL client. This could just be the CLI (eg. shadow-cljs cljs-repl app) or your Editor connected via nREPL. The Client will always talk directly to the shadow-cljs server and it’ll handle the rest. From the Client side it still looks like a regular REPL but there are a few more steps happening in the background.
1) Read: It all starts with reading a singular CLJS form from a given InputStream. That is either a blocking read directly from stdin or read from a string in case of nREPL. A Stream of characters are turned into actual datastructures, "(+ 1 2)" (a string) becomes (+ 1 2) (a list).
2) Compile: That form is then compiled on the shadow-cljs JVM side and transformed to a set of instructions.
3) Transfer Out: Those instructions are transferred to a connected JavaScript runtime. This could be a Browser or a node process.
4) Eval: The connected runtime will take the received instructions and eval them.
5) Print: The eval result is printed as a String in the JS runtime.
6) Transfer Back: The printed result is transferred back to the shadow-cljs JVM side.
7) Reply: The JVM side will forward the received results back to initial caller and the result is printed to the proper OutputStream (or sent as a nREPL message).
8) Loop: Repeat from 1).
16.2.2. JavaScript Runtimes
The shadow-cljs JVM side of things will require one running watch for a given build which will handle all the related REPL commands as well. It uses a dedicated thread and manages all the given events that can happen during development (eg. REPL input, changing files, etc).
The compiled JS code however must also be loaded by a JS runtime (eg. Browser or node process) and that JS runtime must connect back to the running shadow-cljs process. Most :target configurations will have the necessary code added by default and should just connect automatically. How that connect is happening is dependent on the runtime but usually it is using a WebSocket to connect to the running shadow-cljs HTTP server.
Once connected the REPL is ready to use. Note that reloading the JS runtime (eg. manual browser page reload) will wipe out all REPL state of the runtime but some of the compiler side state will remain until the watch is also restarted.
It is possible for more than one JS runtime to connect to the watch process. shadow-cljs by default picks the first JS runtime that connected as the eval target. If you open a given :browser build in multiple Browsers only the first one will be used to eval code. Or you could be opening a :react-native app in iOS and Android next to each other during development. Only one runtime can eval and if that disconnects the next one takes over based on the time it connected.
16.2.3. Missing JS runtime
No application has connected to the REPL server. Make sure your JS environment has loaded your compiled ClojureScript code.
This error message just means that no JS runtime (eg. Browser) has connected to the shadow-cljs server. Your REPL client has successfully connected to the shadow-cljs server but as explained above we still need a JS runtime to actually eval anything.
Regular shadow-cljs builds do not manage any JS runtime of their own so you are responsible for running them.
:target :browser
For :target :browser builds the watch process will have compiled the given code to a configured :output-dir (defaults to public/js). The generated .js must be loaded in a browser. Once loaded the Browser Console should show a WebSocket connected message. If you are using any kind of custom HTTP servers or have over-eager firewalls blocking the connections you might need to set some additional configuration (eg. via :devtools-url). The goal is to be able to connect to the primary HTTP server.
:target :node-script, :node-library
These targets will have produced a .js file that are intended to run in a node process. Given the variety of options however you’ll need to run them yourself. For example a :node-script you’d run via node the-script.js and on startup it’ll try to connect to the shadow-cljs server. You should see a WebSocket connected message on startup. The output is designed to only run on the machine they were compiled on, don’t copy watch output to other machines.
:target :react-native
The generated <:output-dir>/index.js file needs to be added to your react-native app and then loaded on an actual device or emulator. On startup it will also attempt to connect to the shadow-cljs server. You can check the log output via react-native log-android|log-ios and should show a WebSocket connected message once the app is running. If you see a websocket related error on startup instead it may have failed to connect to the shadow-cljs process. This can happen when the IP detection picked an incorrect IP. You can check which IP was used via shadow-cljs watch app --verbose and override it via shadow-cljs watch app --config-merge '{:local-ip "1.2.3.4"}'.
17. Publishing Libraries
ClojureScript libraries are published to maven repositories just like Clojure. Most commonly they are published to Clojars but all other standard maven repositories work too.
shadow-cljs itself does not have direct support for publishing but since ClojureScript libraries are just uncompiled source files published in a JAR (basically just a ZIP compressed file) any common tool that is able to publish to maven will work. (eg. mvn, gradle, lein, etc). No extra compilation or other steps are required to publish. The ClojureScript compiler and therefore shadow-cljs is not involved at all.
17.1. Leiningen
There are a variety of options to publish libraries and I currently recommend Leiningen. The setup is very straightforward and doesn’t require much configuration at all.
|
Important
|
This does not mean that you have to use Leiningen during development of the library itself. It is recommended to just use Leiningen for publishing but use shadow-cljs normally otherwise. You’ll only need to copy the actual :dependencies definition once you publish. Remember to keep development related dependencies out though.
|
Assuming you are already using the recommended project structure where all your primary sources are located in src/main you can publish with a very simple project.clj.
(defproject your.cool/library "1.0.0"
:description "Does cool stuff"
:url "https://the.inter.net/wherever"
;; this is optional, add what you want or remove it
:license {:name "Eclipse Public License"
:url "http://www.eclipse.org/legal/epl-v10.html"}
:dependencies
;; always use "provided" for Clojure(Script)
[[org.clojure/clojurescript "1.10.520" :scope "provided"]
[some.other/library "1.0.0"]]
:source-paths
["src/main"])This will generate the required pom.xml and put all sources from src/main into the published .jar file. All you need to run is lein deploy clojars to publish it. When doing this for the first time you’ll first need to setup proper authentication. Please refer to the official Leiningen and Clojars documentation on how to set that up.
17.1.1. Disable JAR Signing
Leiningen defaults to signing libraries via GPG before publishing which is a good default but given that this can be a hassle to setup and not many people are actually verifying the signatures you can disable that step via adding a simple :repositories config to the project.clj.
(defproject your.cool/library "1.0.0"
...
:repositories
{"clojars" {:url "https://clojars.org/repo"
:sign-releases false}}
...)17.1.2. Keep your JAR clean
If you write tests or user other development related code for your library make sure to keep them in src/dev or src/test to avoid publishing them together with the library.
Also avoid generating output to resources/* since Leiningen and other tools may include those files into the .jar which may cause problems for downstream users. Your .jar should ONLY contains the actual source files, no compiled code at all.
|
Important
|
You can and should verify that everything is clean by running lein jar and inspecting the files that end up in it via jar -tvf target/library-1.0.0.jar.
|
17.2. Declaring JS dependencies
Please note that currently only shadow-cljs has a clean automatic interop story with npm. That may represent a problem for users of your libraries using other tools. You may want to consider providing a CLJSJS fallback and/or publishing extra documentation for webpack related workflows.
You can declare npm dependencies directly by including a deps.cljs with :npm-deps in your project (eg. src/main/deps.cljs).
{:npm-deps {"the-thing" "1.0.0"}}You can also provide extra :foreign-libs definitions here. They won’t affect shadow-cljs but might help other tools.
See https://clojurescript.org/reference/packaging-foreign-deps for more info.
18. What to do when things don’t work?
Since the JS world is still evolving rapidly and not everyone is using the same way to write and
distribute code there are some things shadow-cljs cannot work around automatically. These
can usually be solved with custom :resolve configs, but there may also be bugs or oversights.
If you cannot resolve such an issue with the instructions in this chapter, then try asking on the
#shadow-cljs Slack channel.
19. Hacking
19.1. Patching Libraries
The shadow-cljs compiler ensures that things on your source paths are compiled first, overriding files from JARs. This means that you can copy a source file from a library, patch it, and include it in your own source directory.
This is a convenient way to test out fixes (even to shadow-cljs itself!) without having to clone
that project and understand its setup, build, etc.